Soildrops Controller

Smart irrigation controller with AI-powered watering schedules

Getting Started

Creating Your Soildrops Account

Before you can set up your controller, you'll need a Soildrops account. It only takes a minute.

Creating Your Account

  1. Download the Soildrops app from the app Store (iPhone) or Google Play (Android).
  2. Open the app — you'll see a splash screen with a "Let's get started!" button. Tap it.
  3. Enter your first name, last name, and email address.
  4. Create a password you'll remember.
  5. Tap "Create Account" and you're in.

Quick Sign-In Options

You can also sign up with Apple, Google, or Facebook by tapping the icons on the login screen — it's faster if you prefer not to create a separate password.

Tip: Use the same email address you'd want for support correspondence. You can always update it later in your profile settings.

Soildrops Controller Installation Tutorial

Physical installation takes about 15 minutes. You'll mount the controller, connect your irrigation wires, and pair it through the app. Here's the full walkthrough.

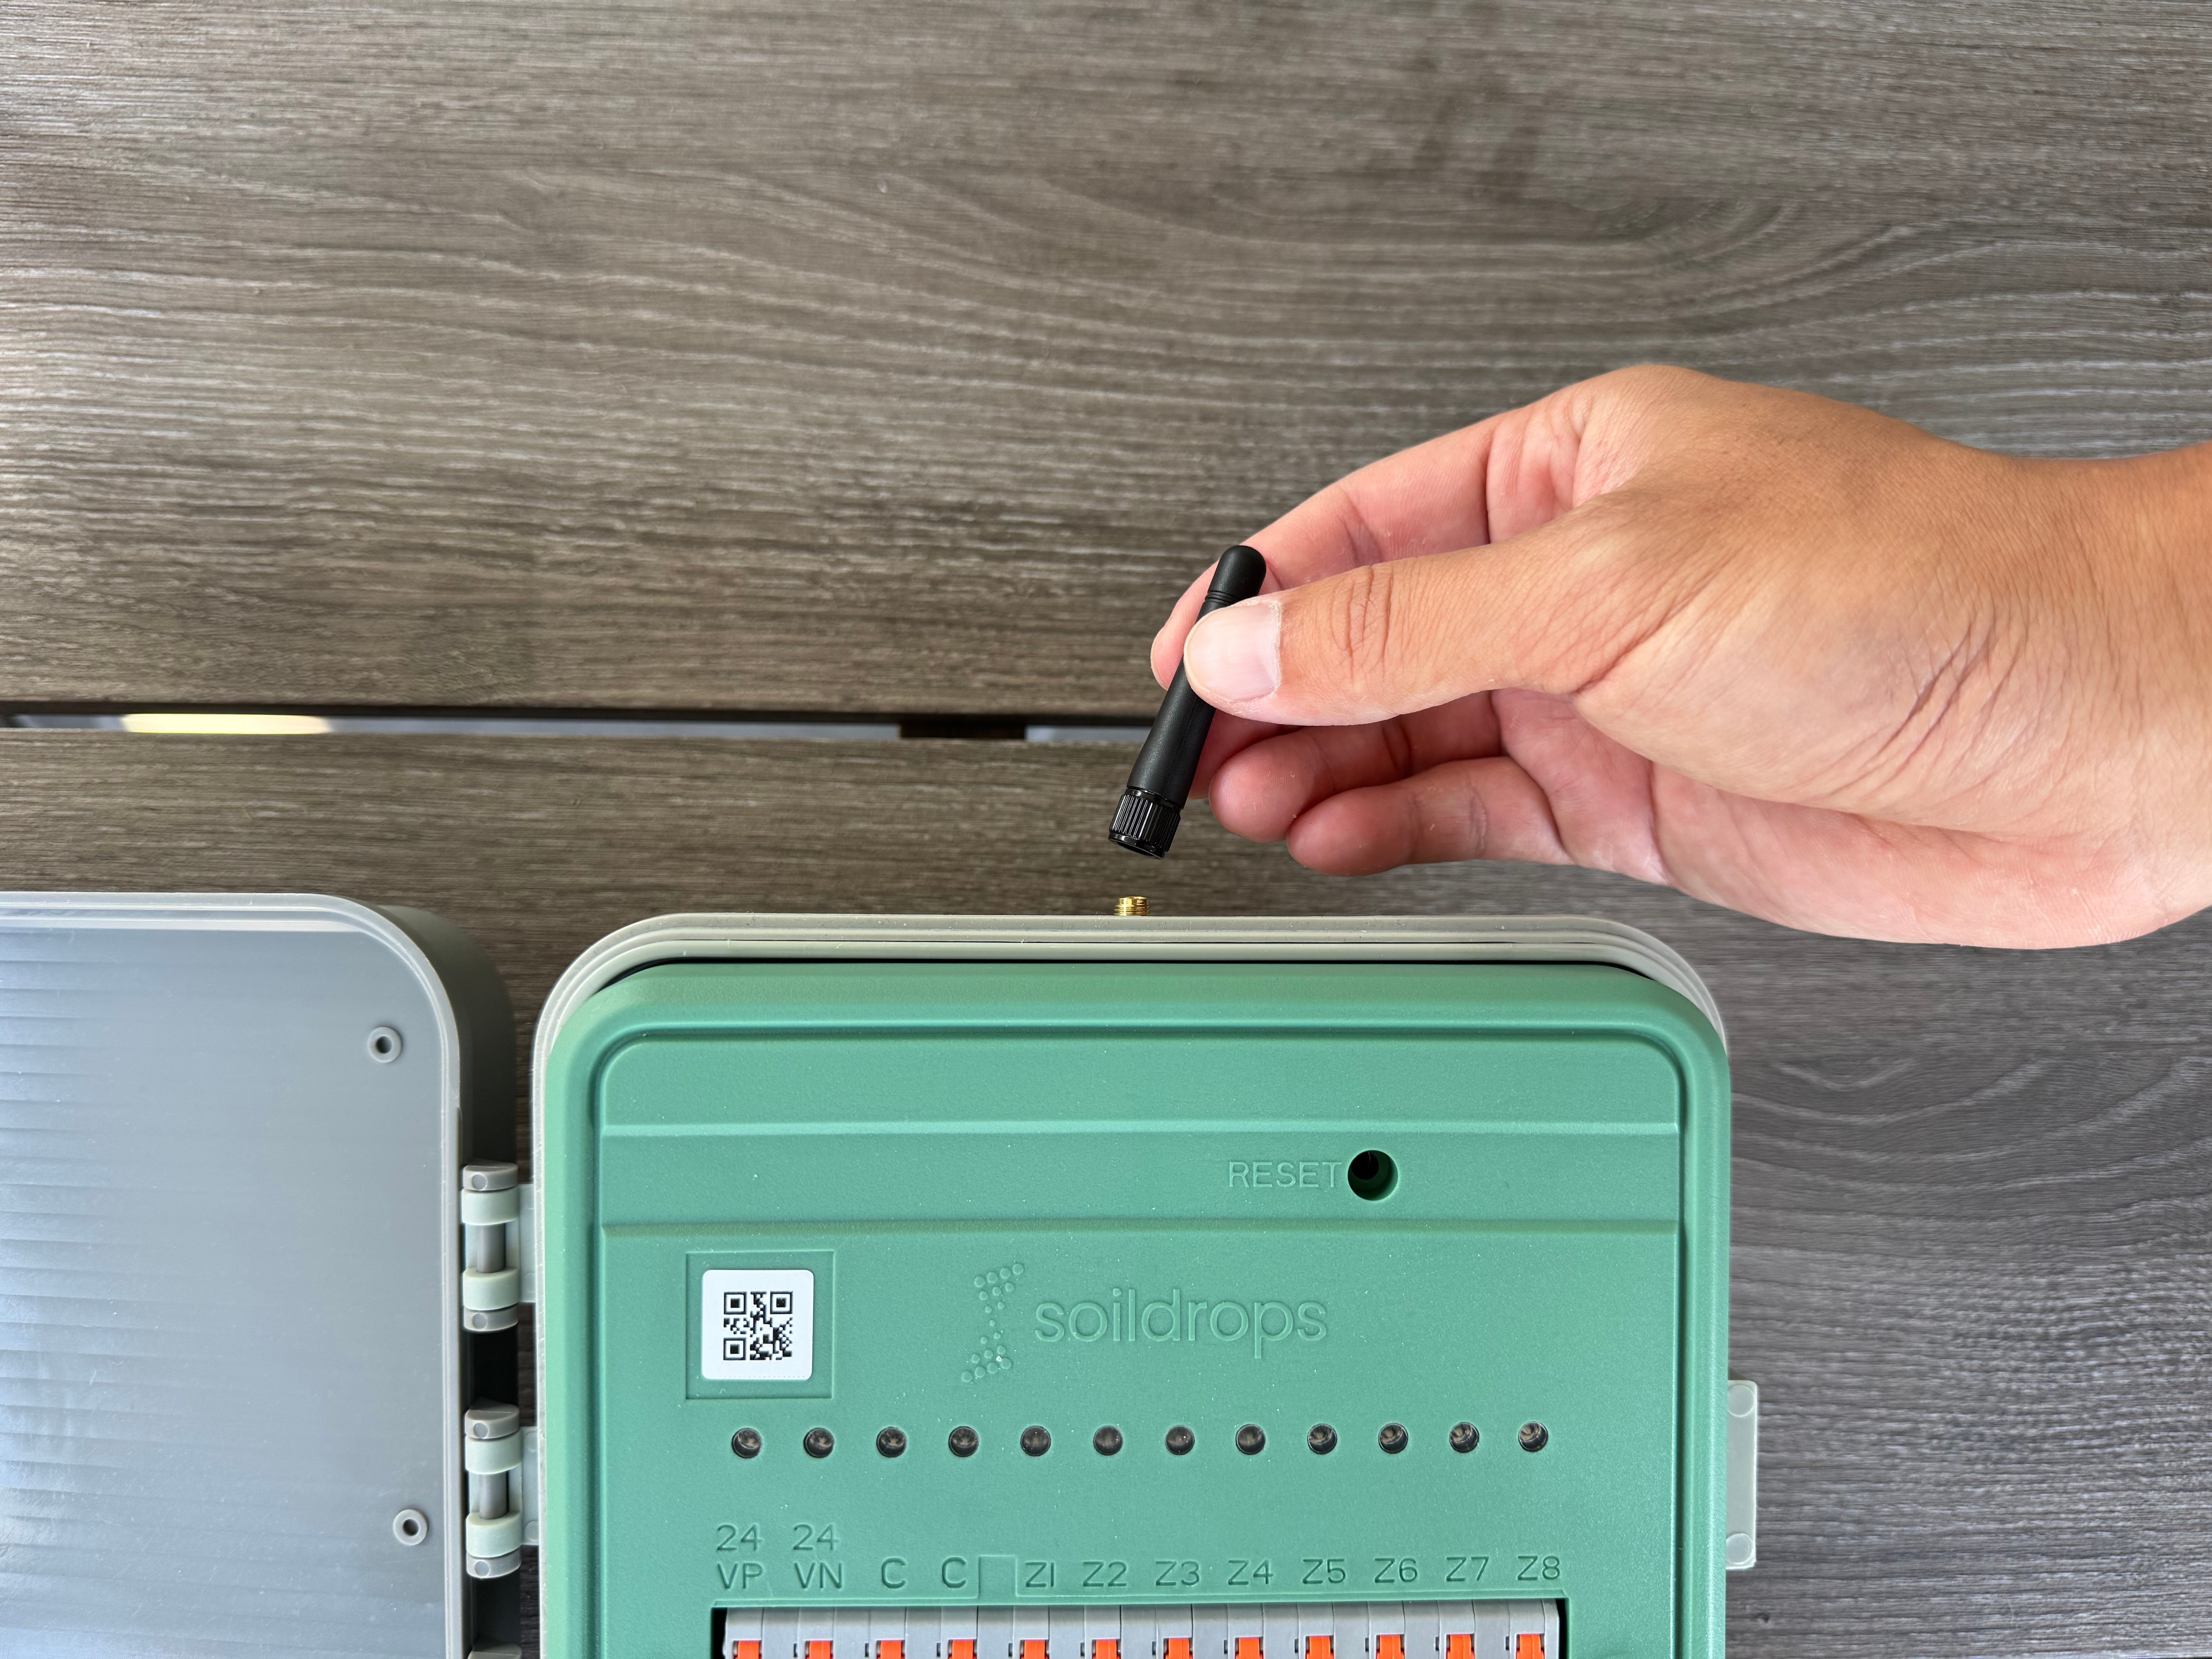
Step 1 — Attach the Antenna

Twist the included antenna securely onto the controller. This is what communicates with your sensors.

Attaching the antenna to the controller

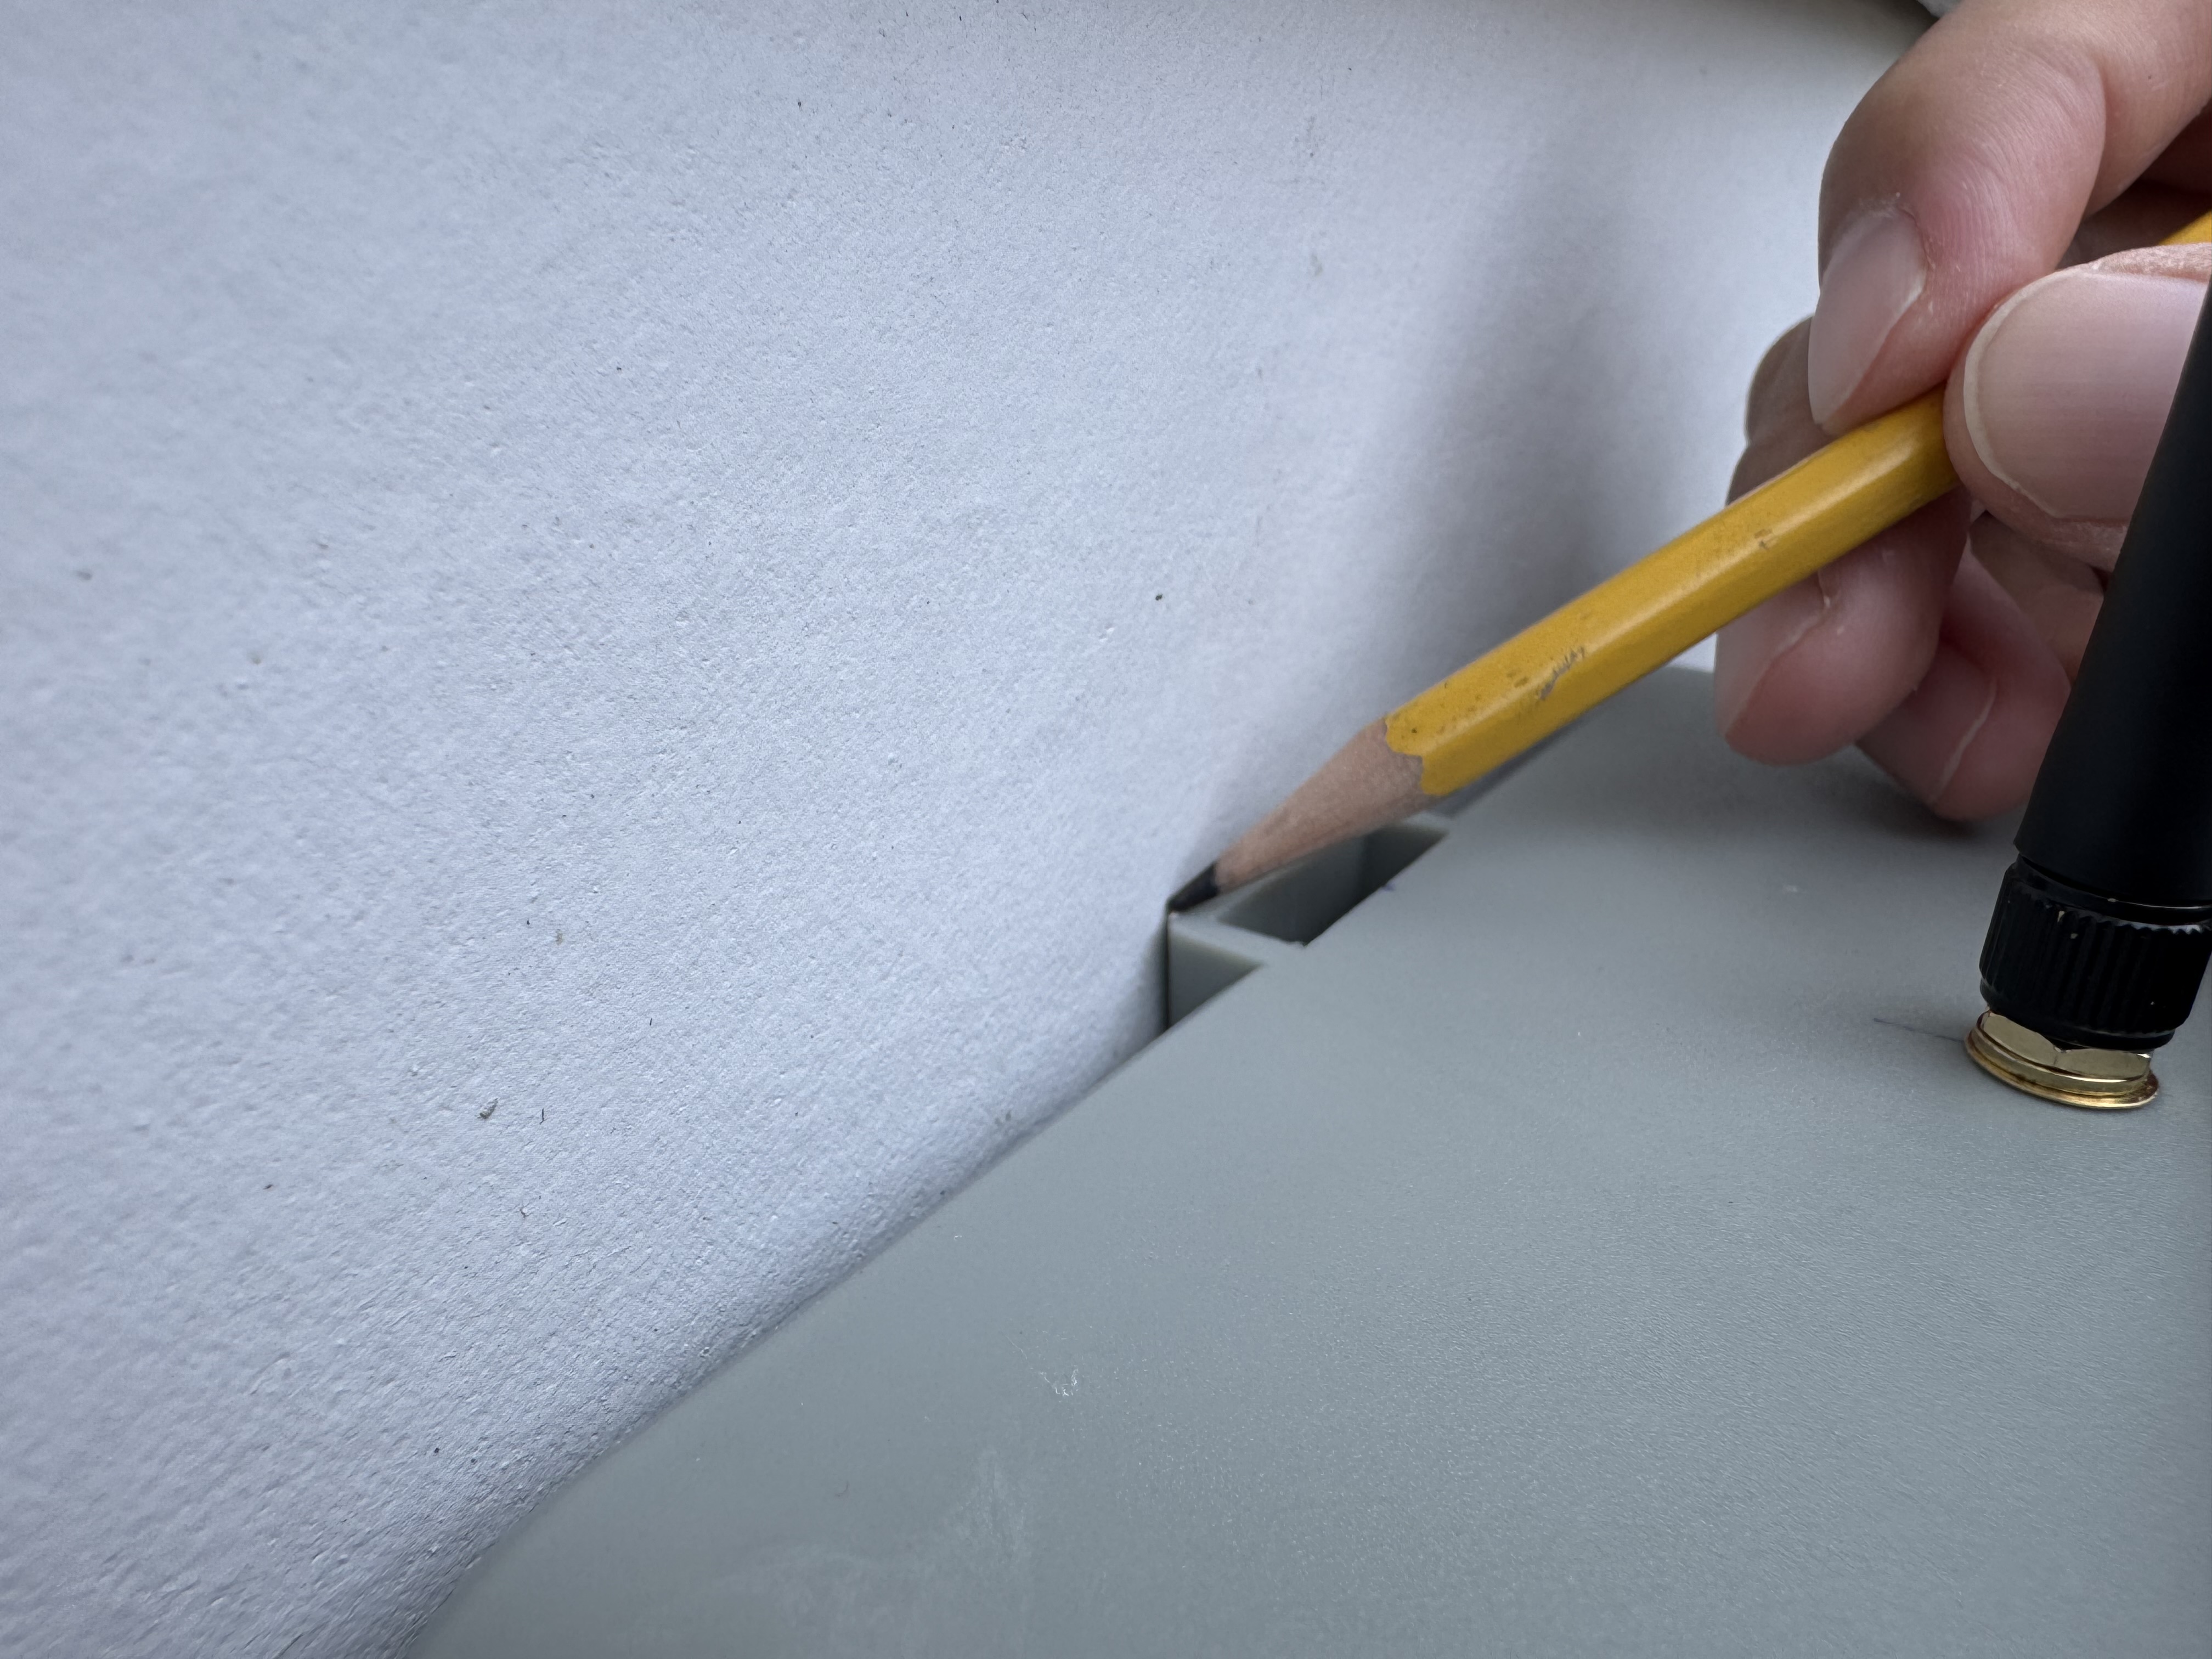
Step 2 — Choose Your Location

Find a spot where the power cord and irrigation wires can comfortably reach the controller. Mark the top screw position with a pencil.

Choosing the controller mounting location

Step 3 — Mount the Controller

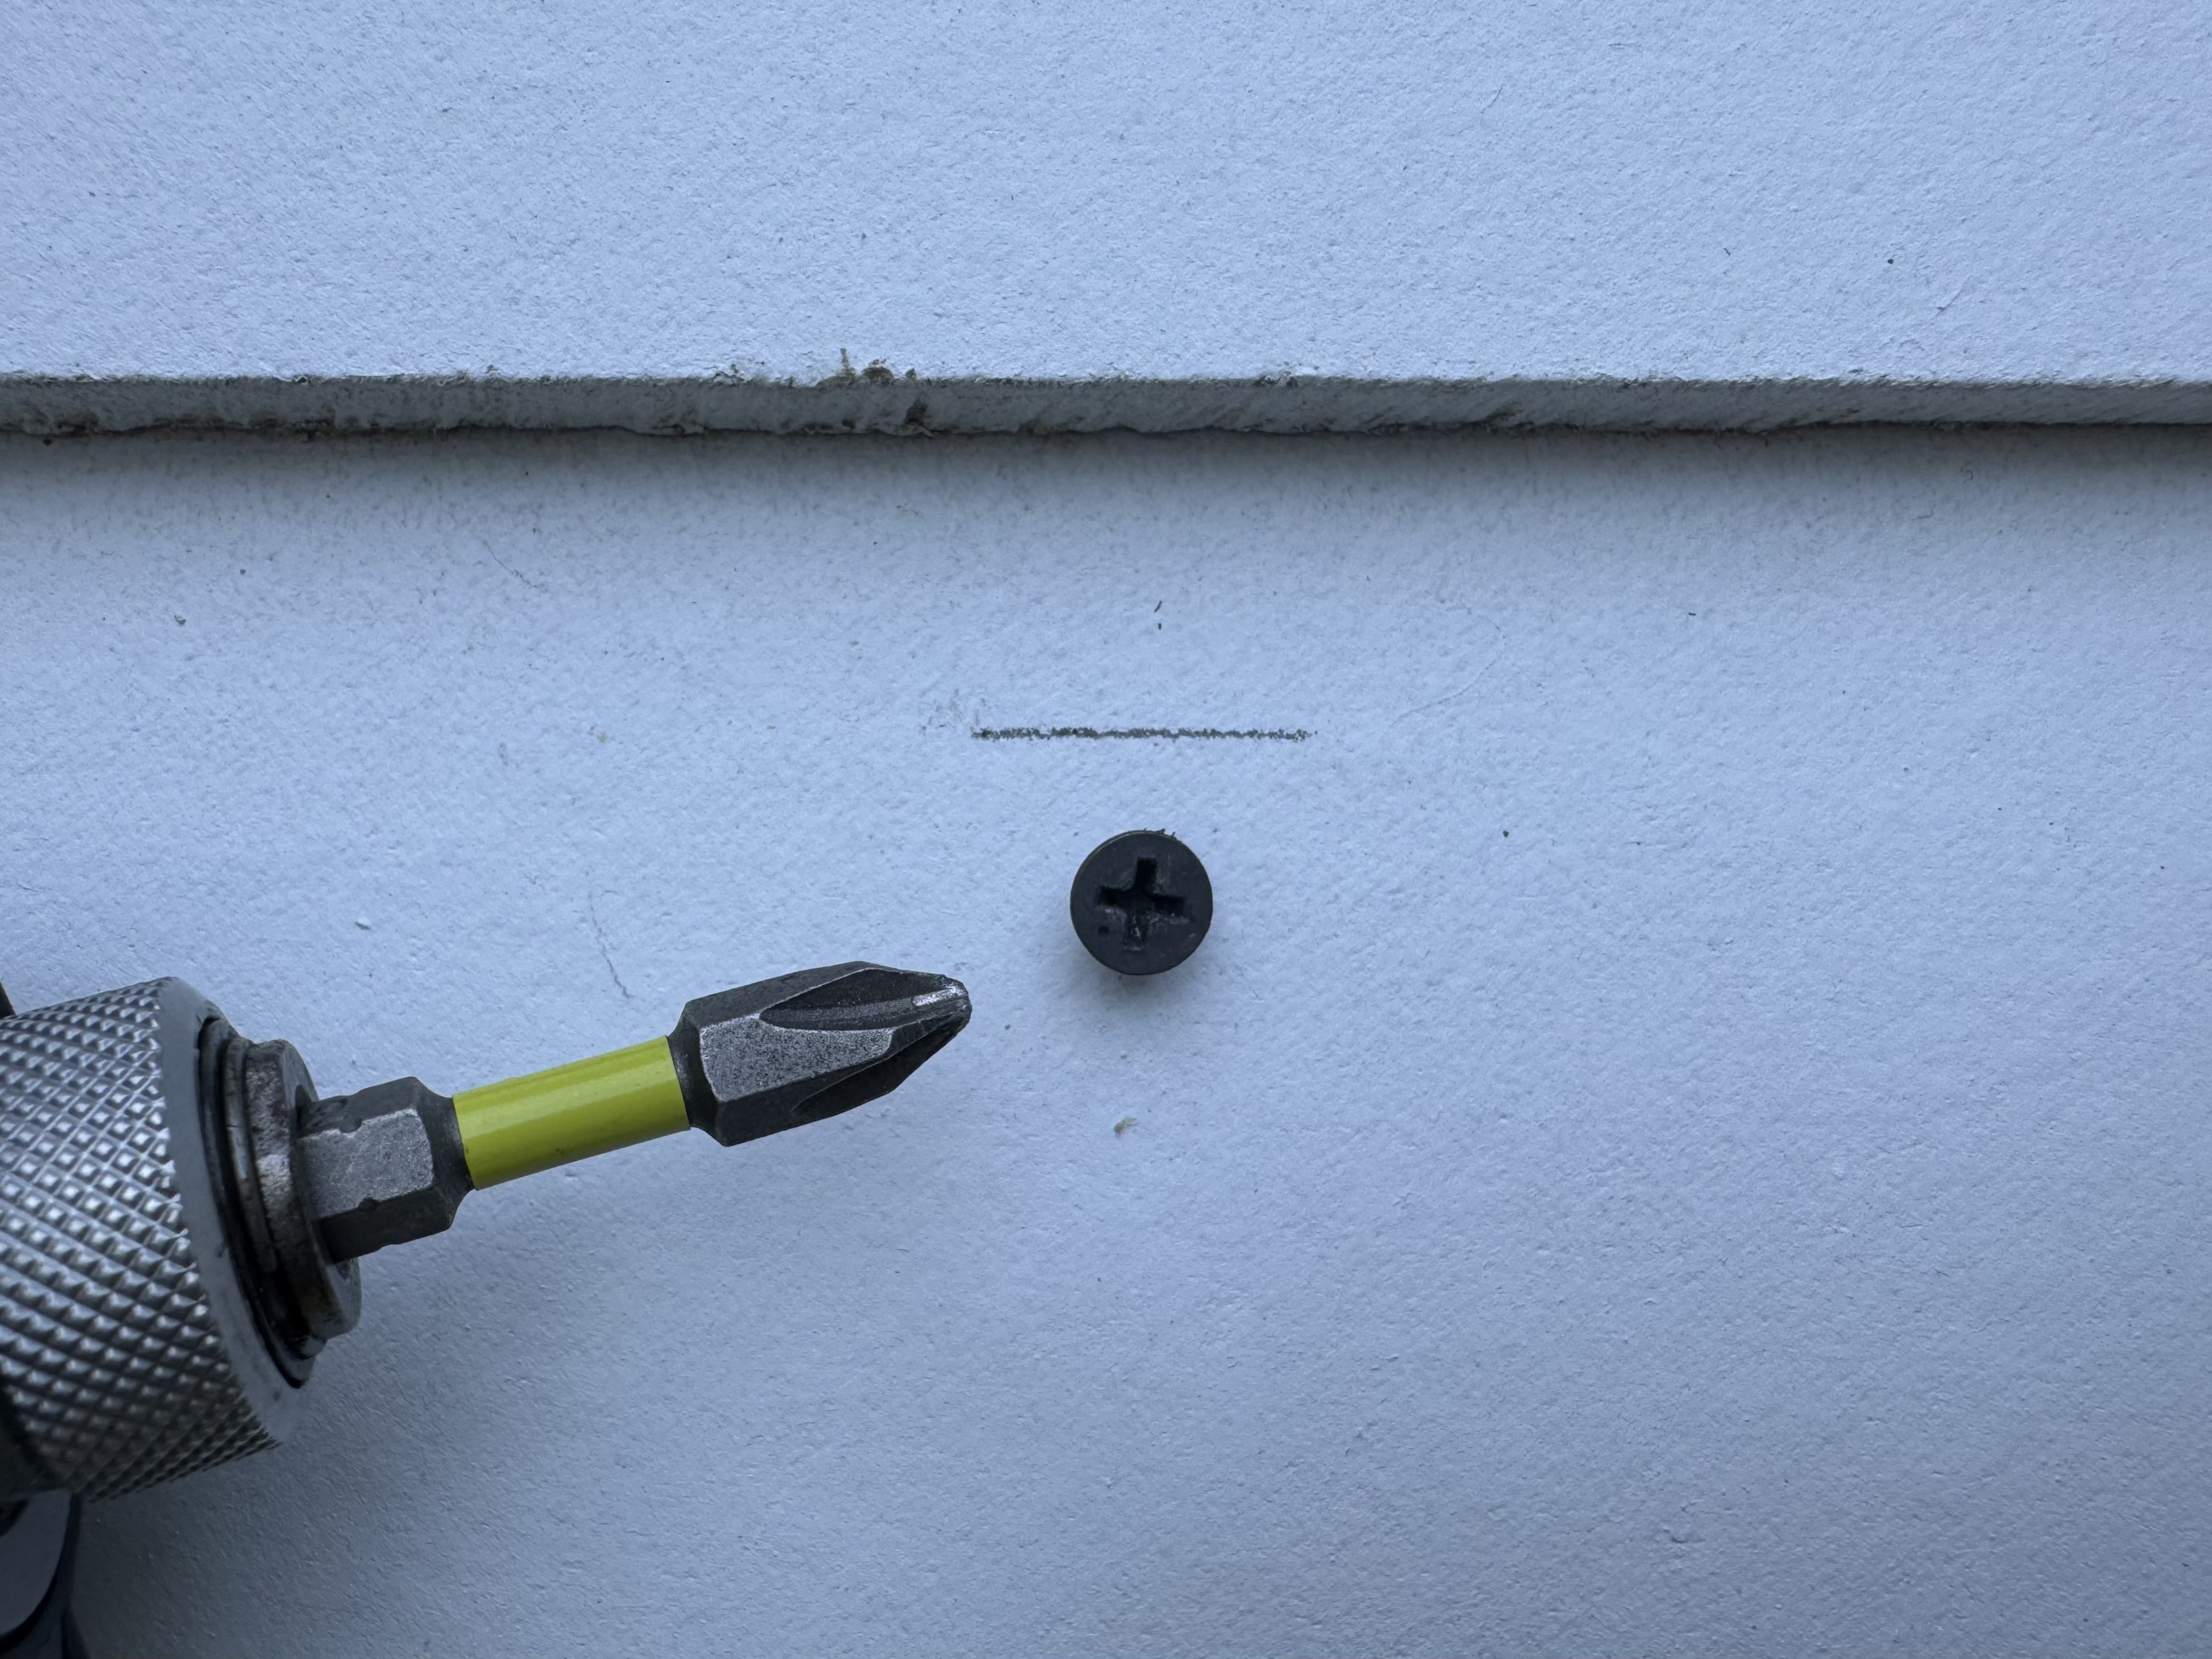
  1. Use a 3/16" drill bit to drill the first screw through the drywall, 3/8" below your mark, leaving about 1/4" of the screw sticking out for hanging.
  2. Drilling the first screw

  3. Hang the controller on the first screw and make sure it's level.
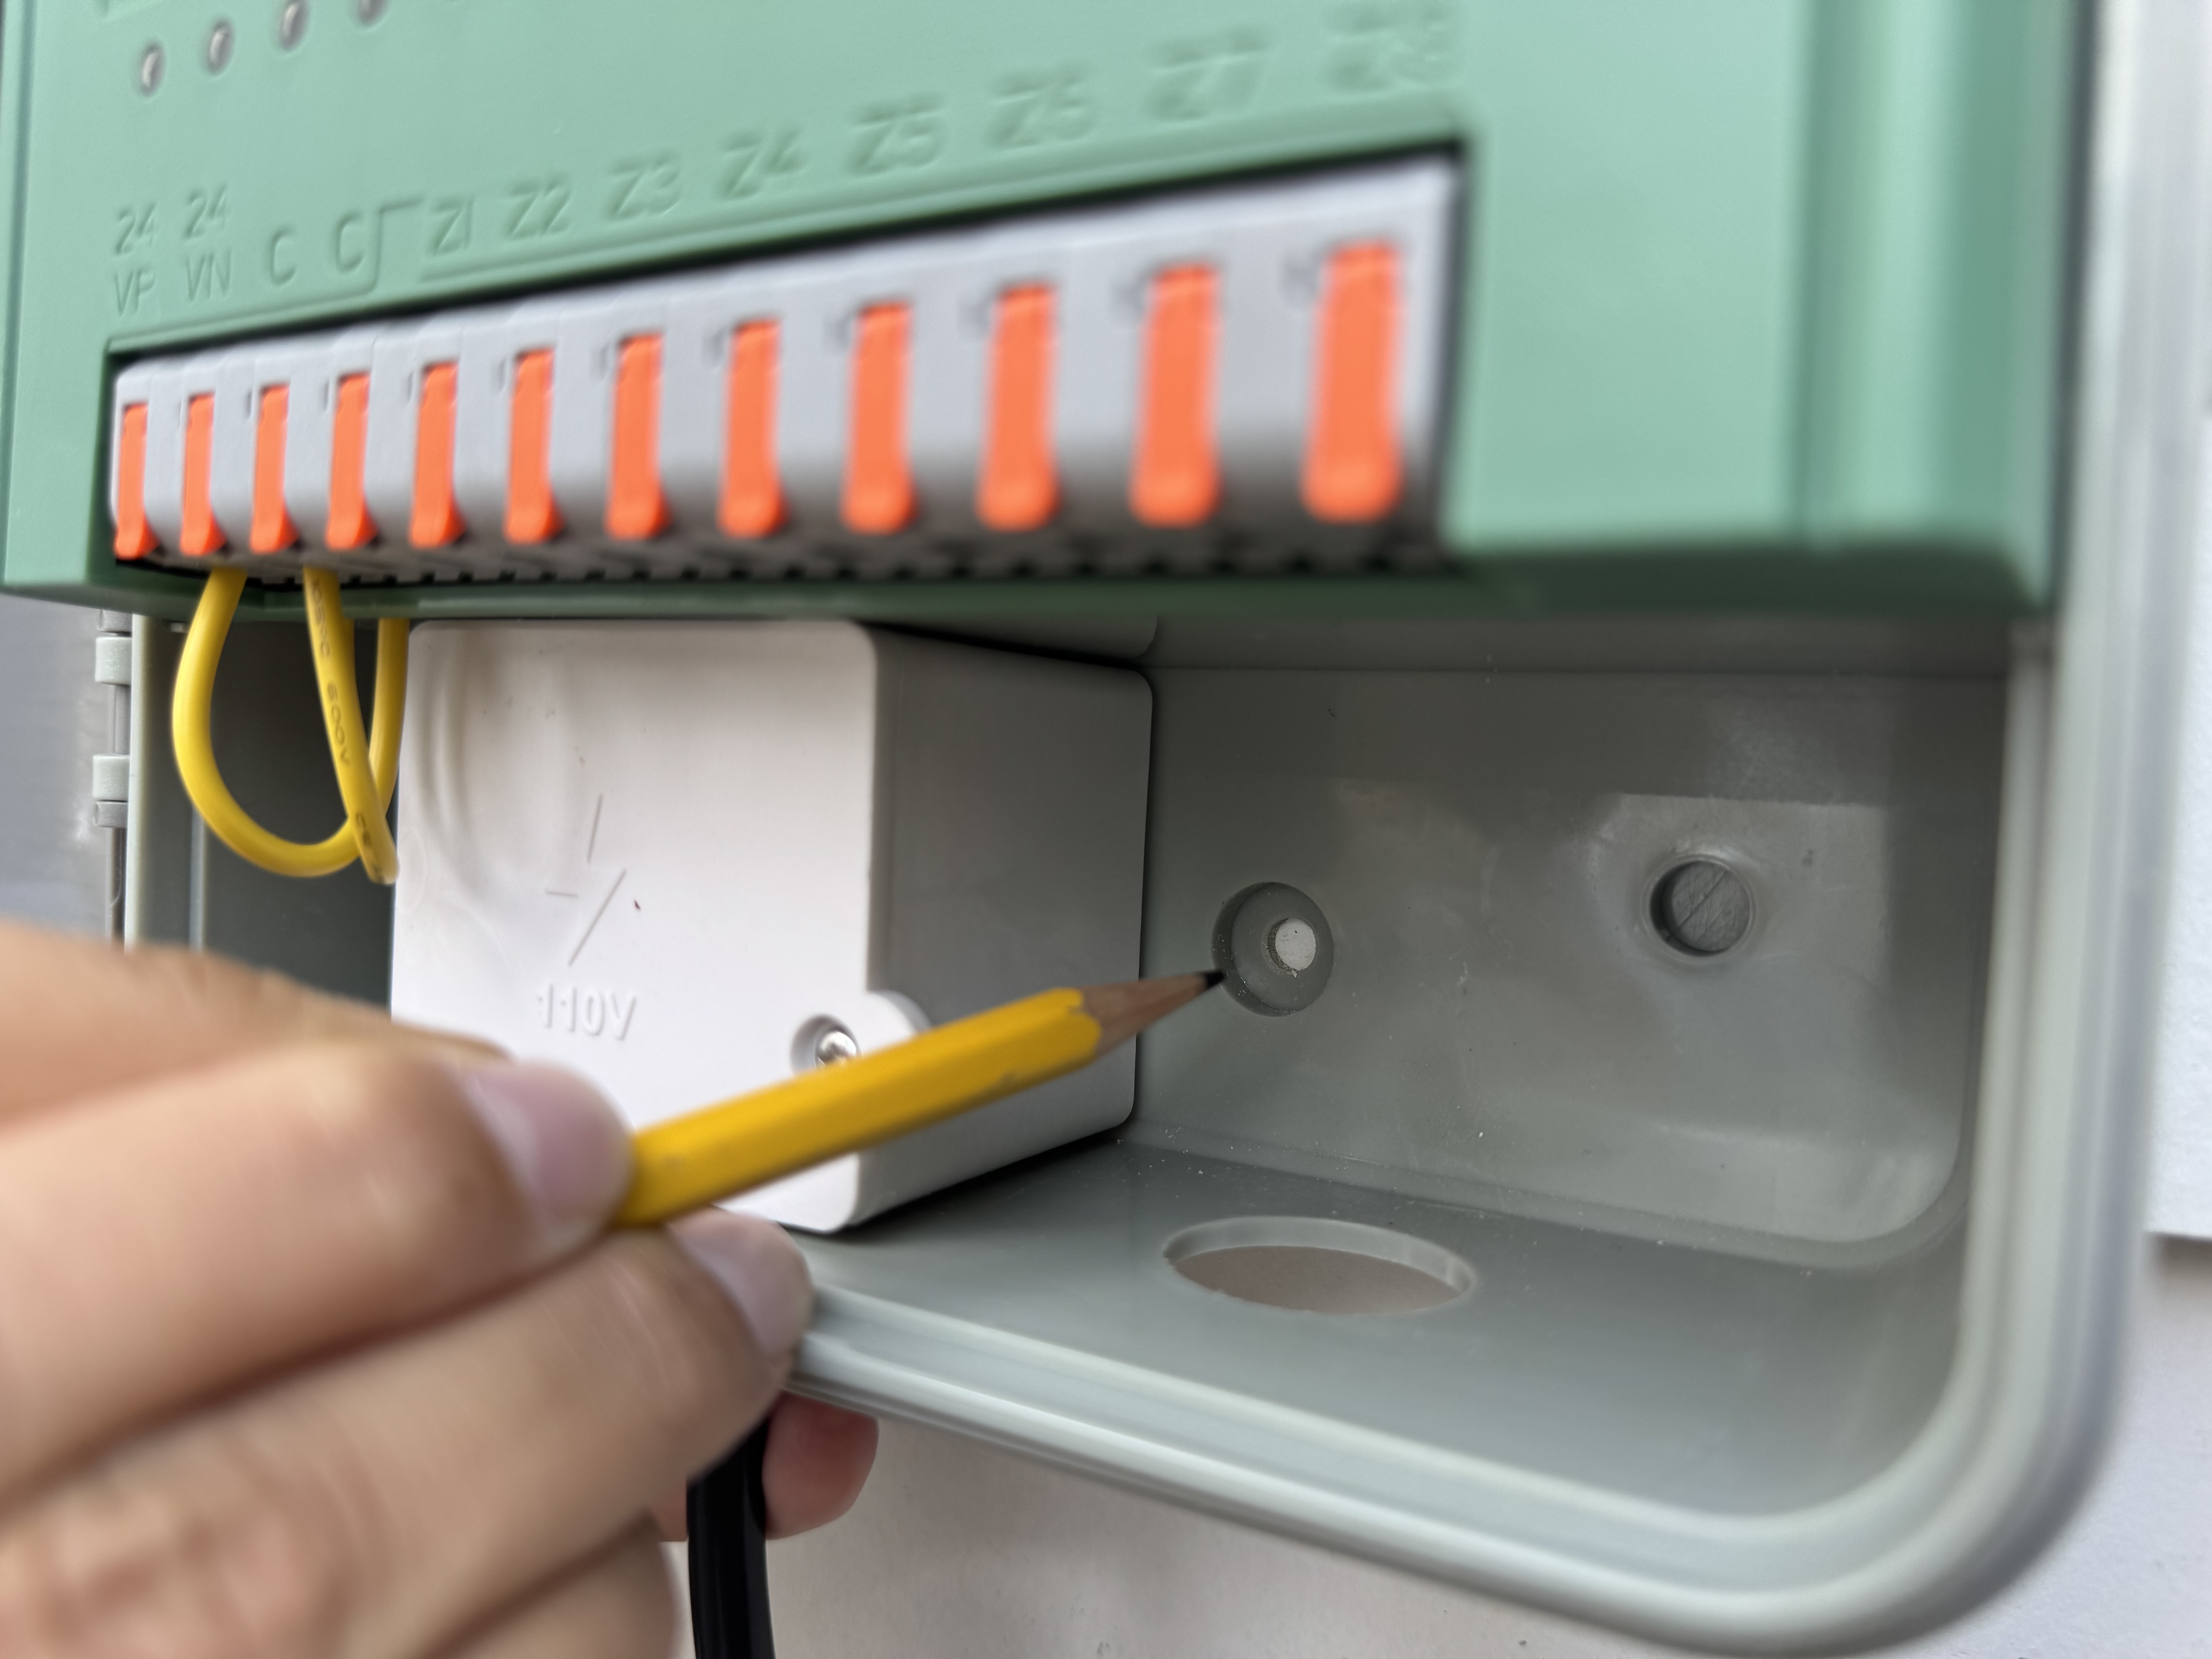
  4. Mark the spot for the second anchor with a pencil.
  5. Hanging the controller and marking second anchor

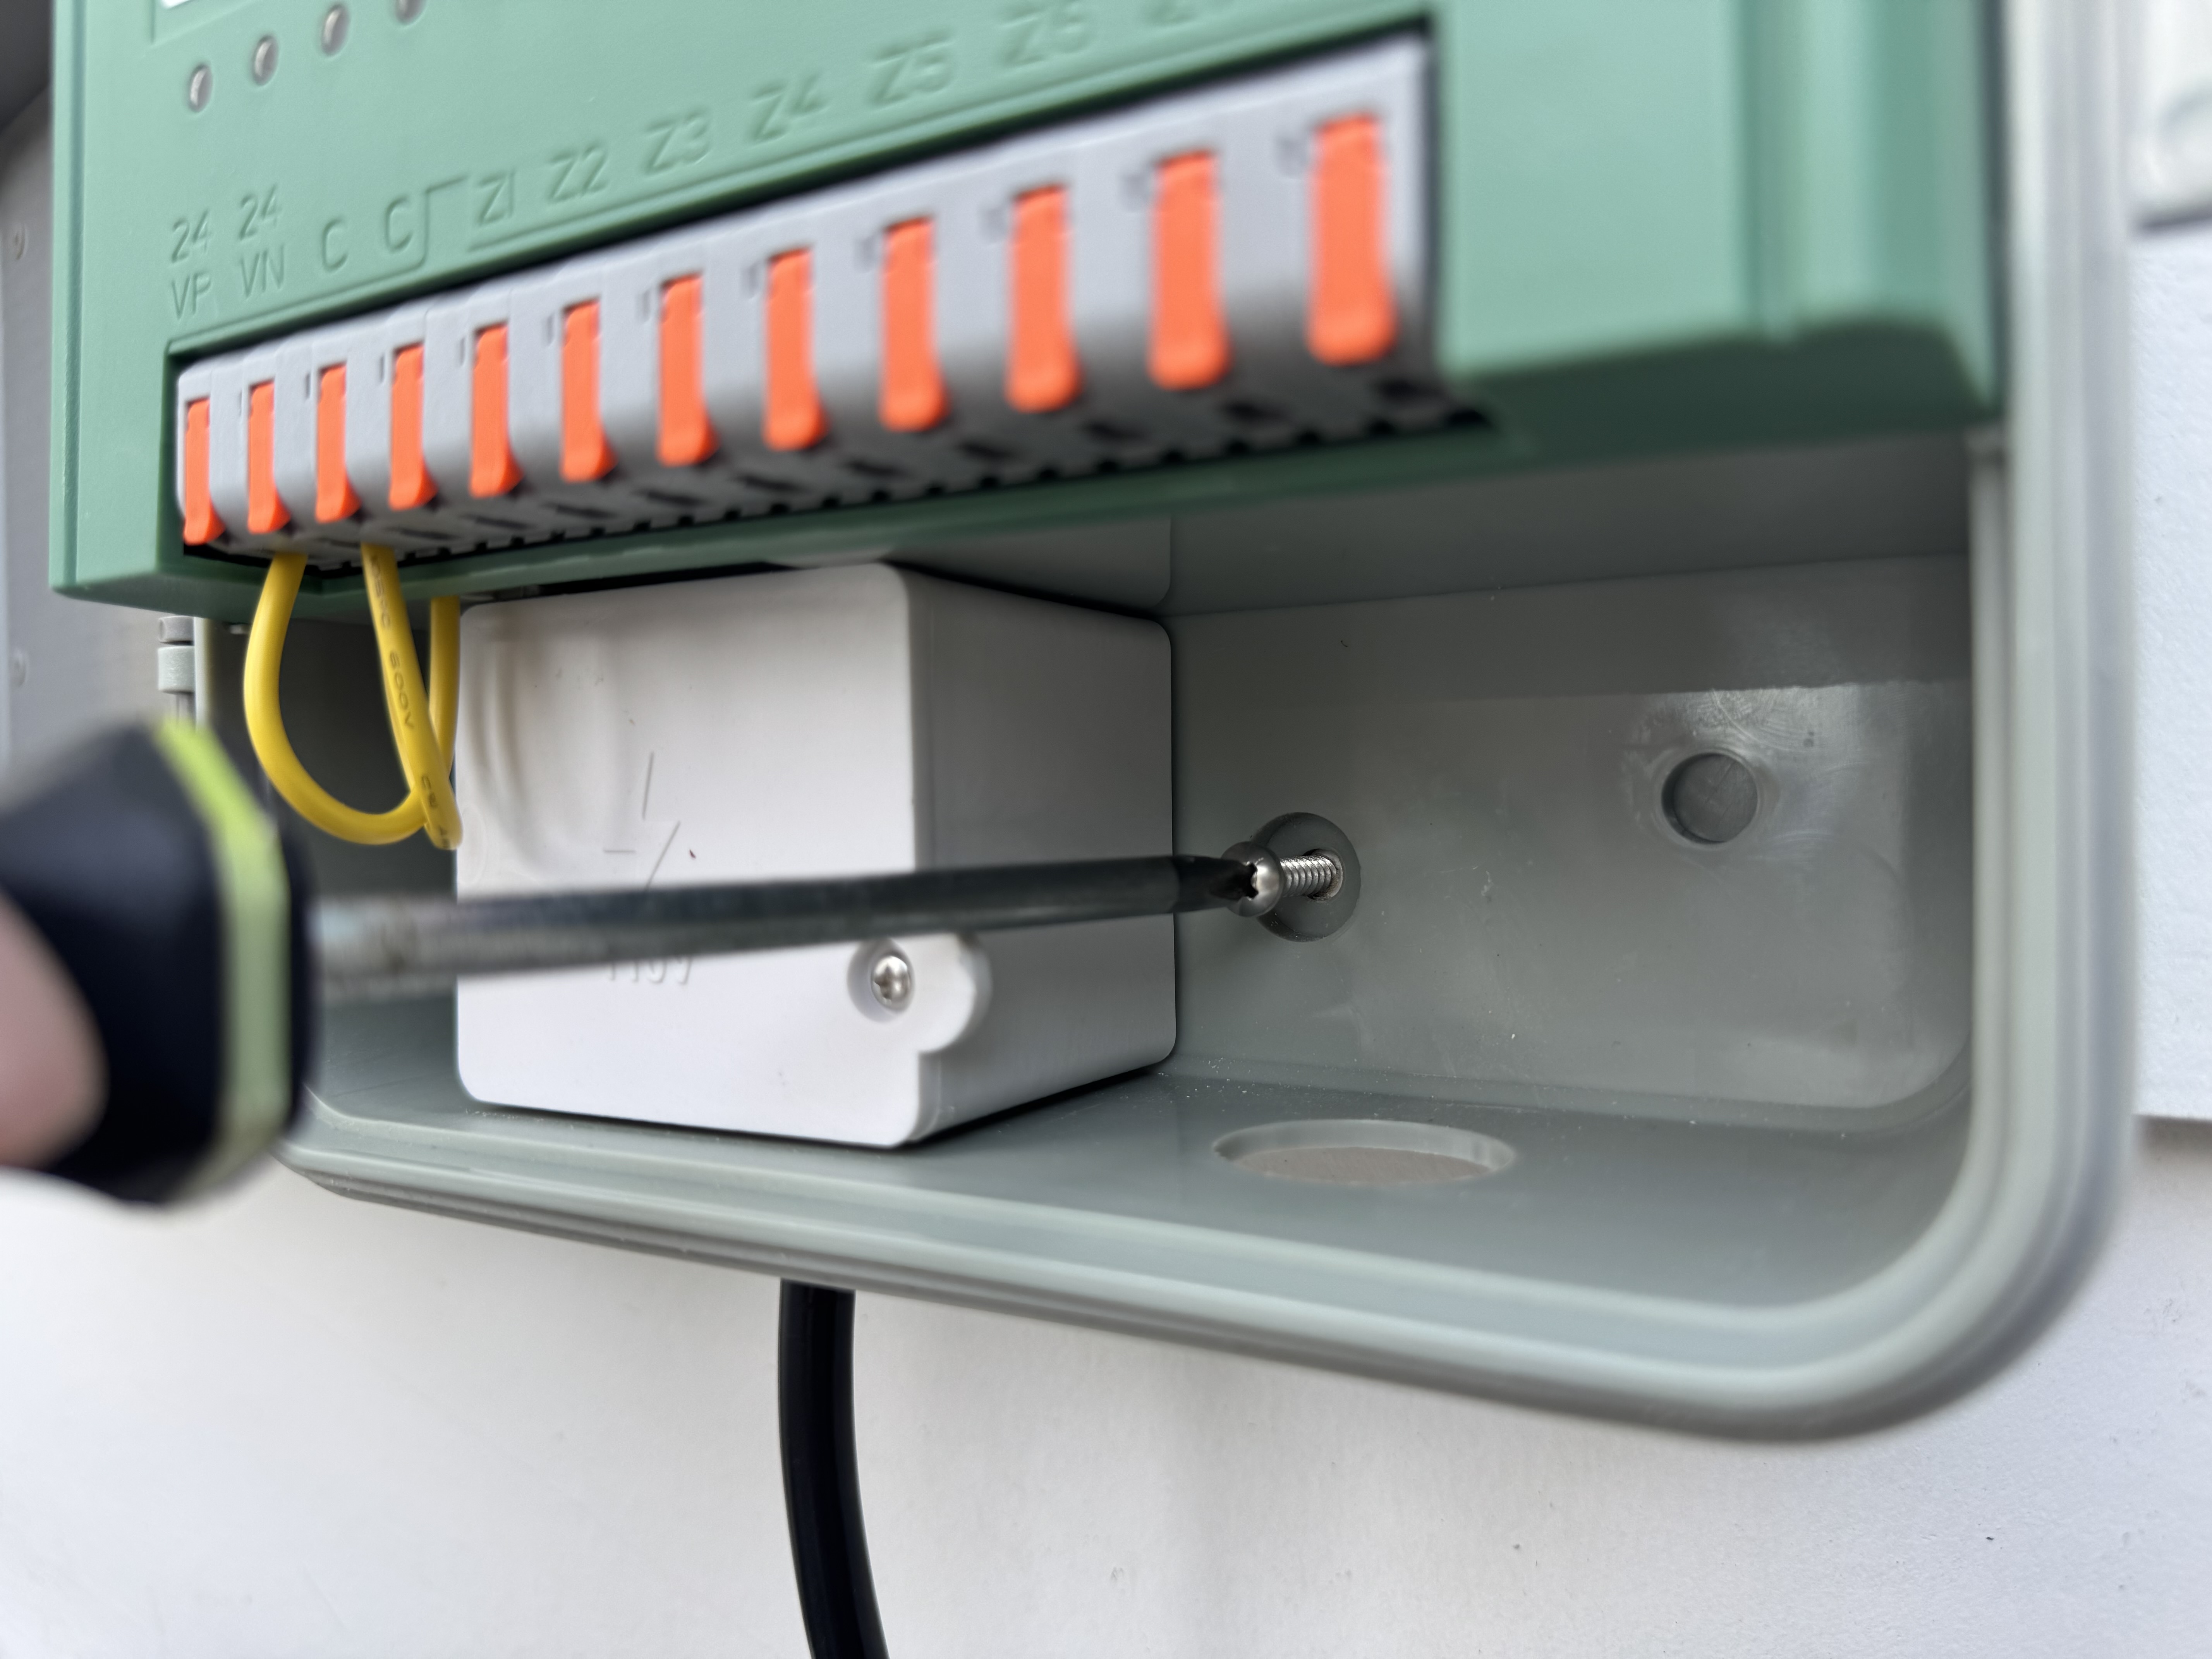
  6. Drill a hole for the second anchor and tighten the screw with a Phillips screwdriver.

Tightening the second anchor screw

Step 4 — Connect Sprinkler Wires

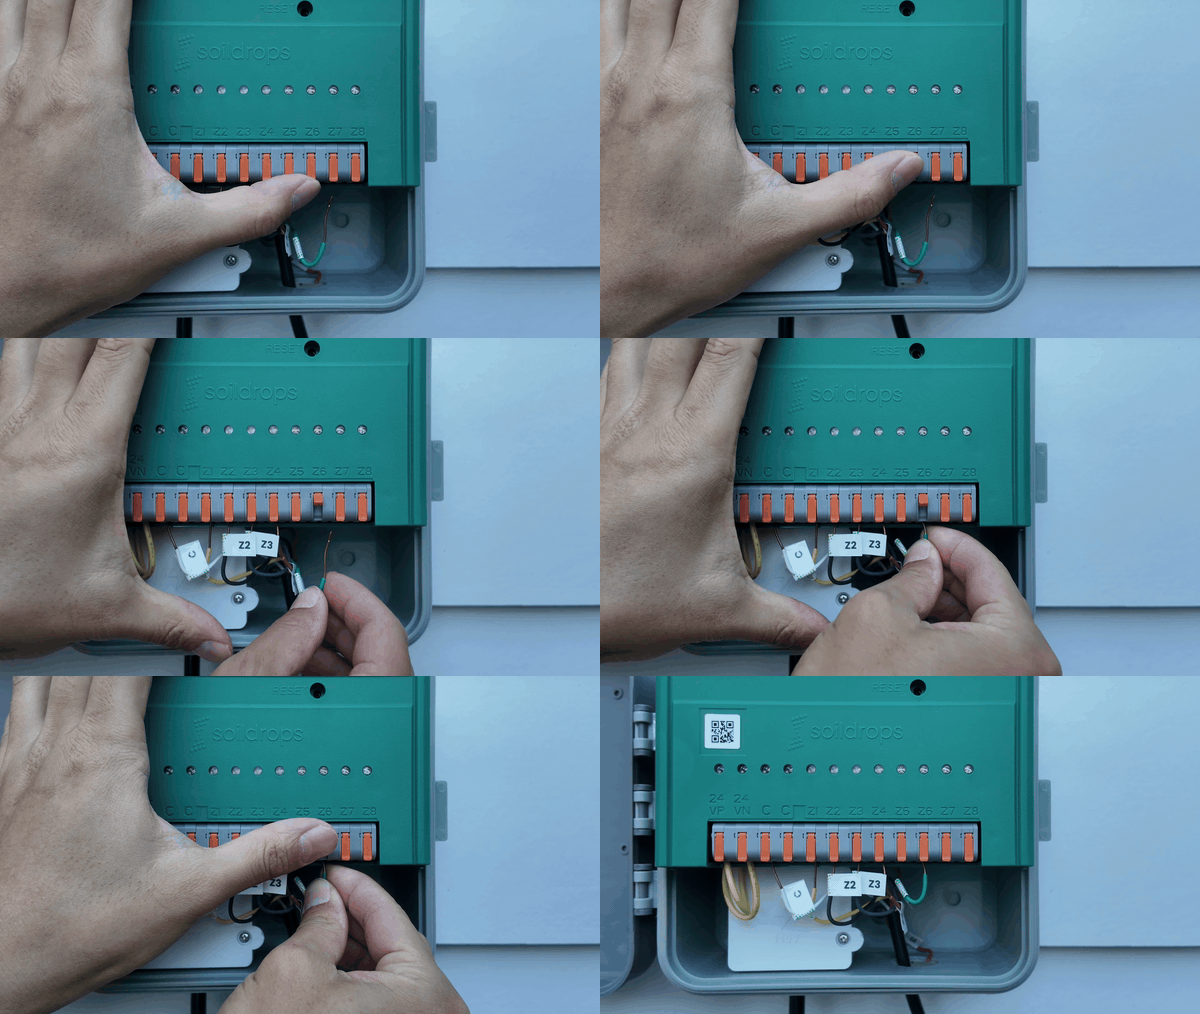
Connect your existing irrigation valve wires to the controller's terminal block. Each zone wire goes to its own numbered terminal. The common wire goes to the "C" terminal.

Connecting sprinkler wires to the controller

Step 5 — Power Up

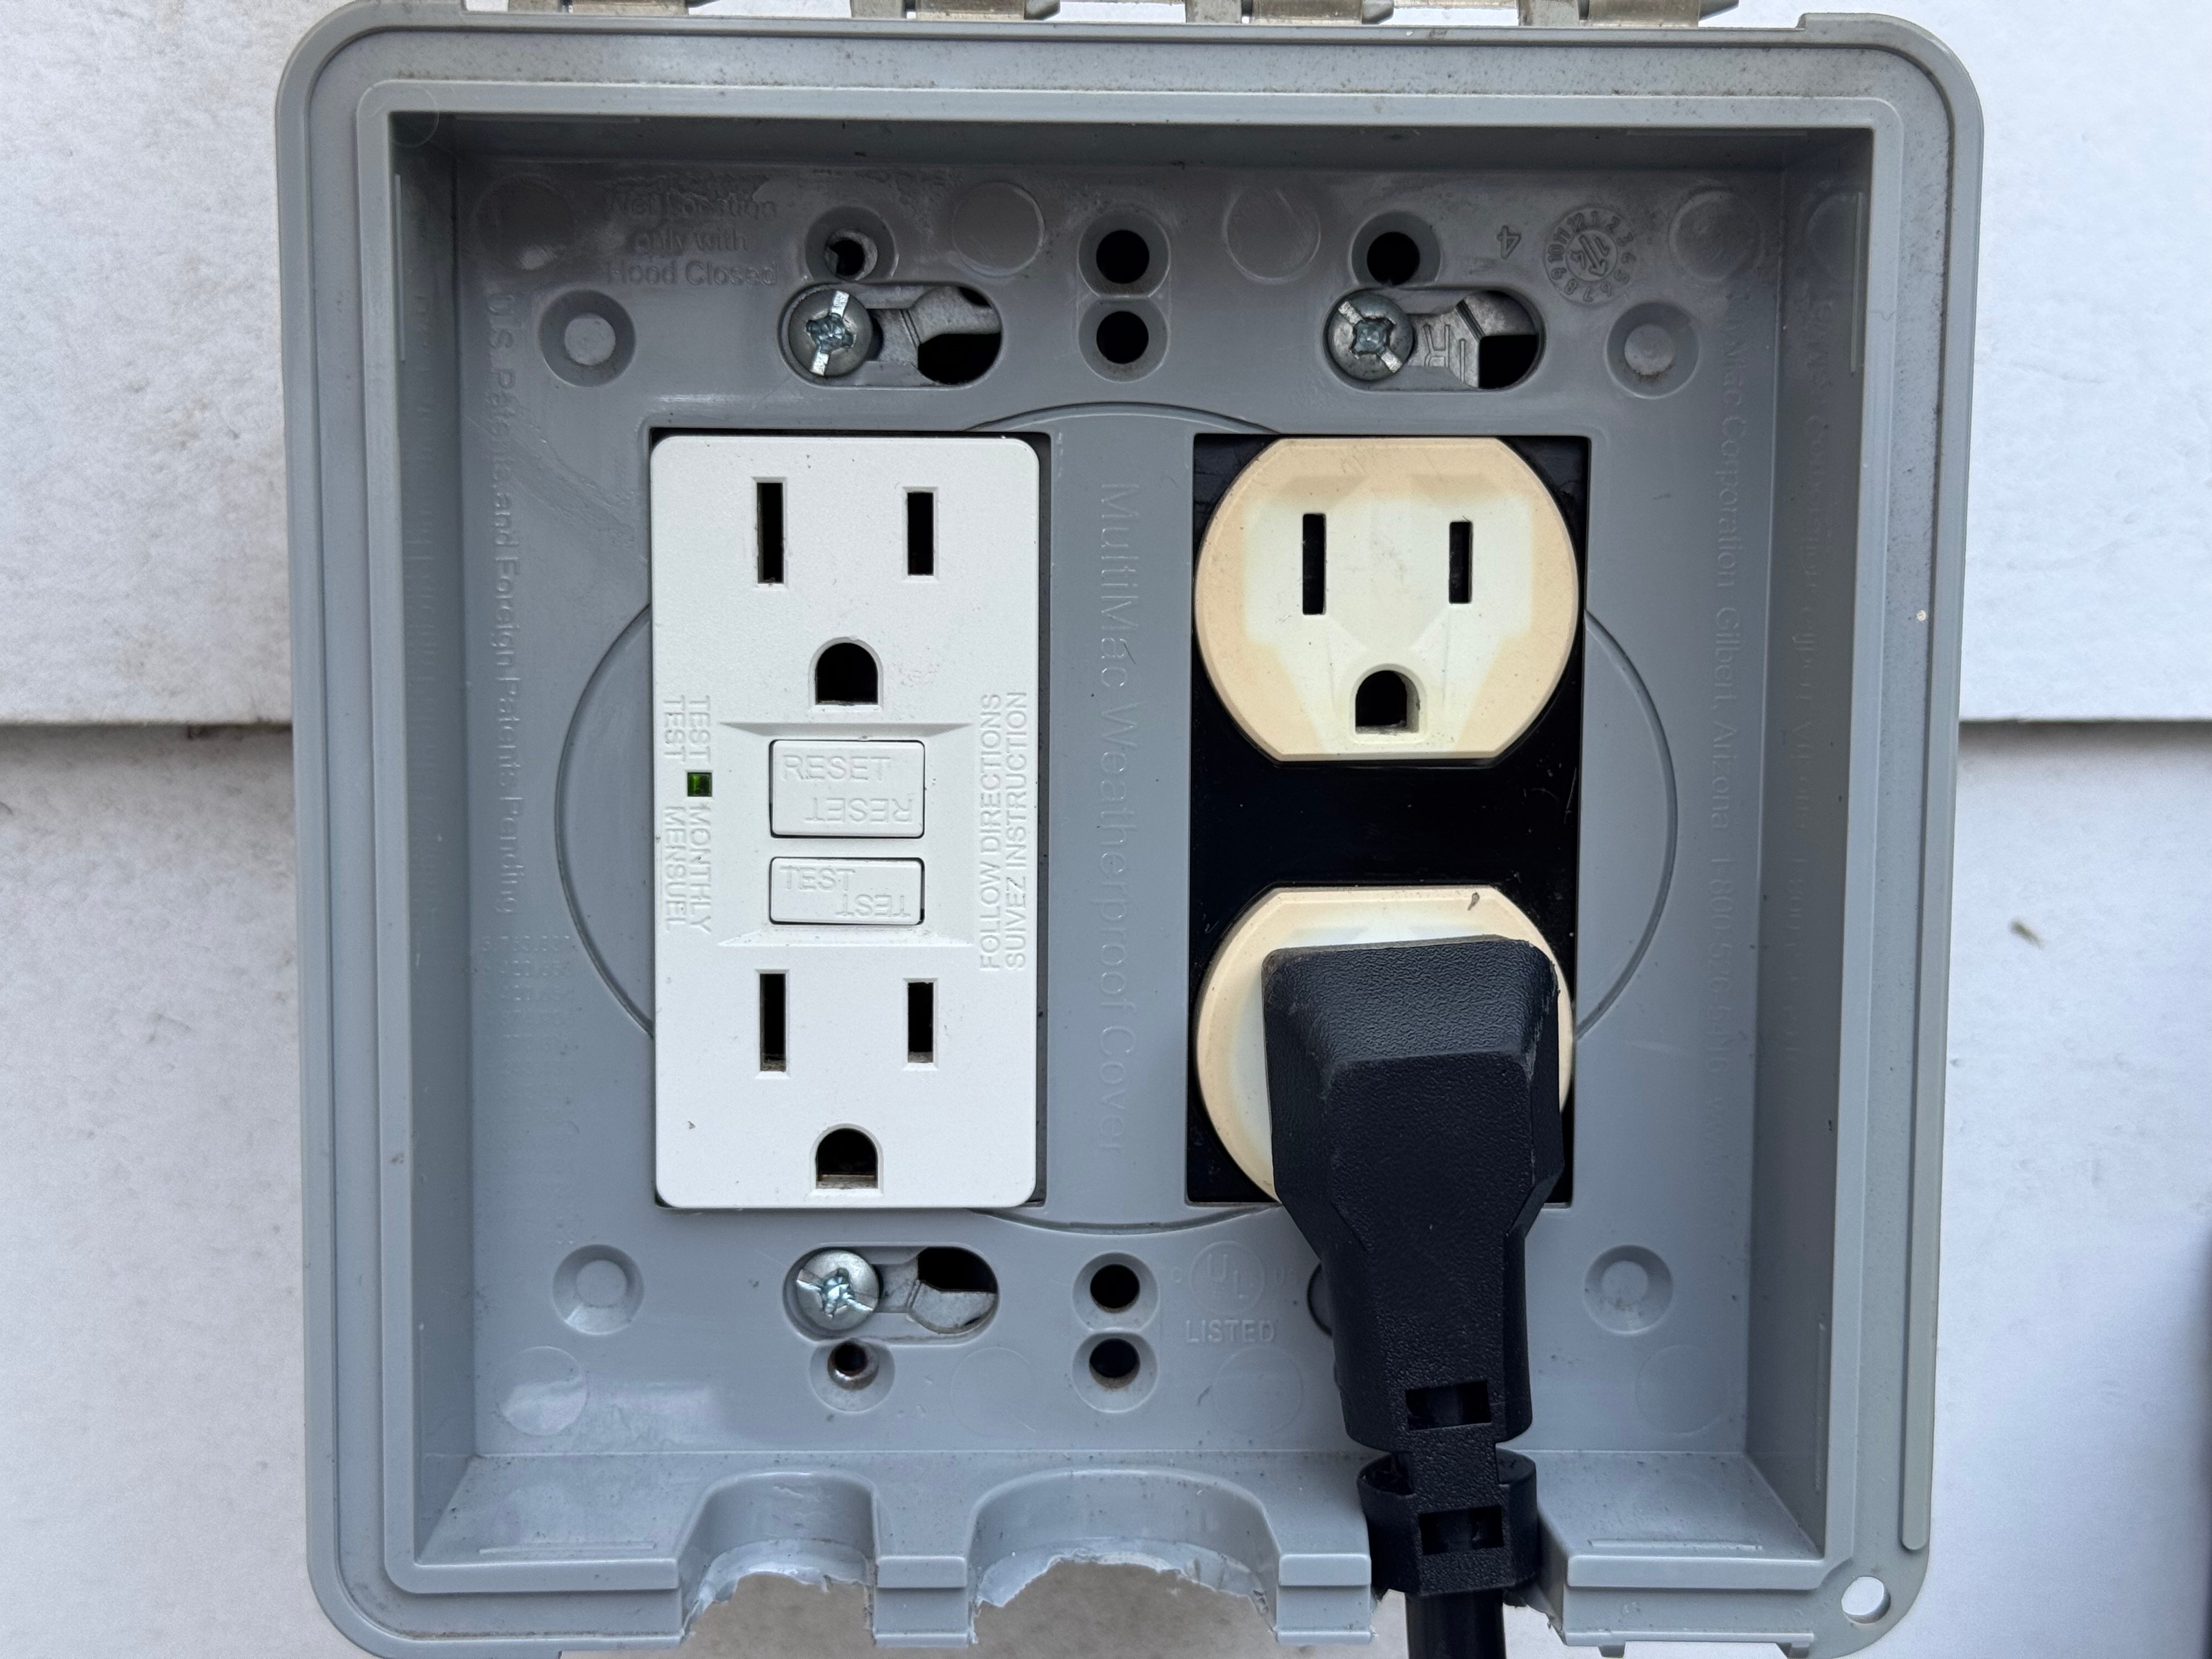
  1. Plug in the power adapter.
  2. Connecting power to the controller

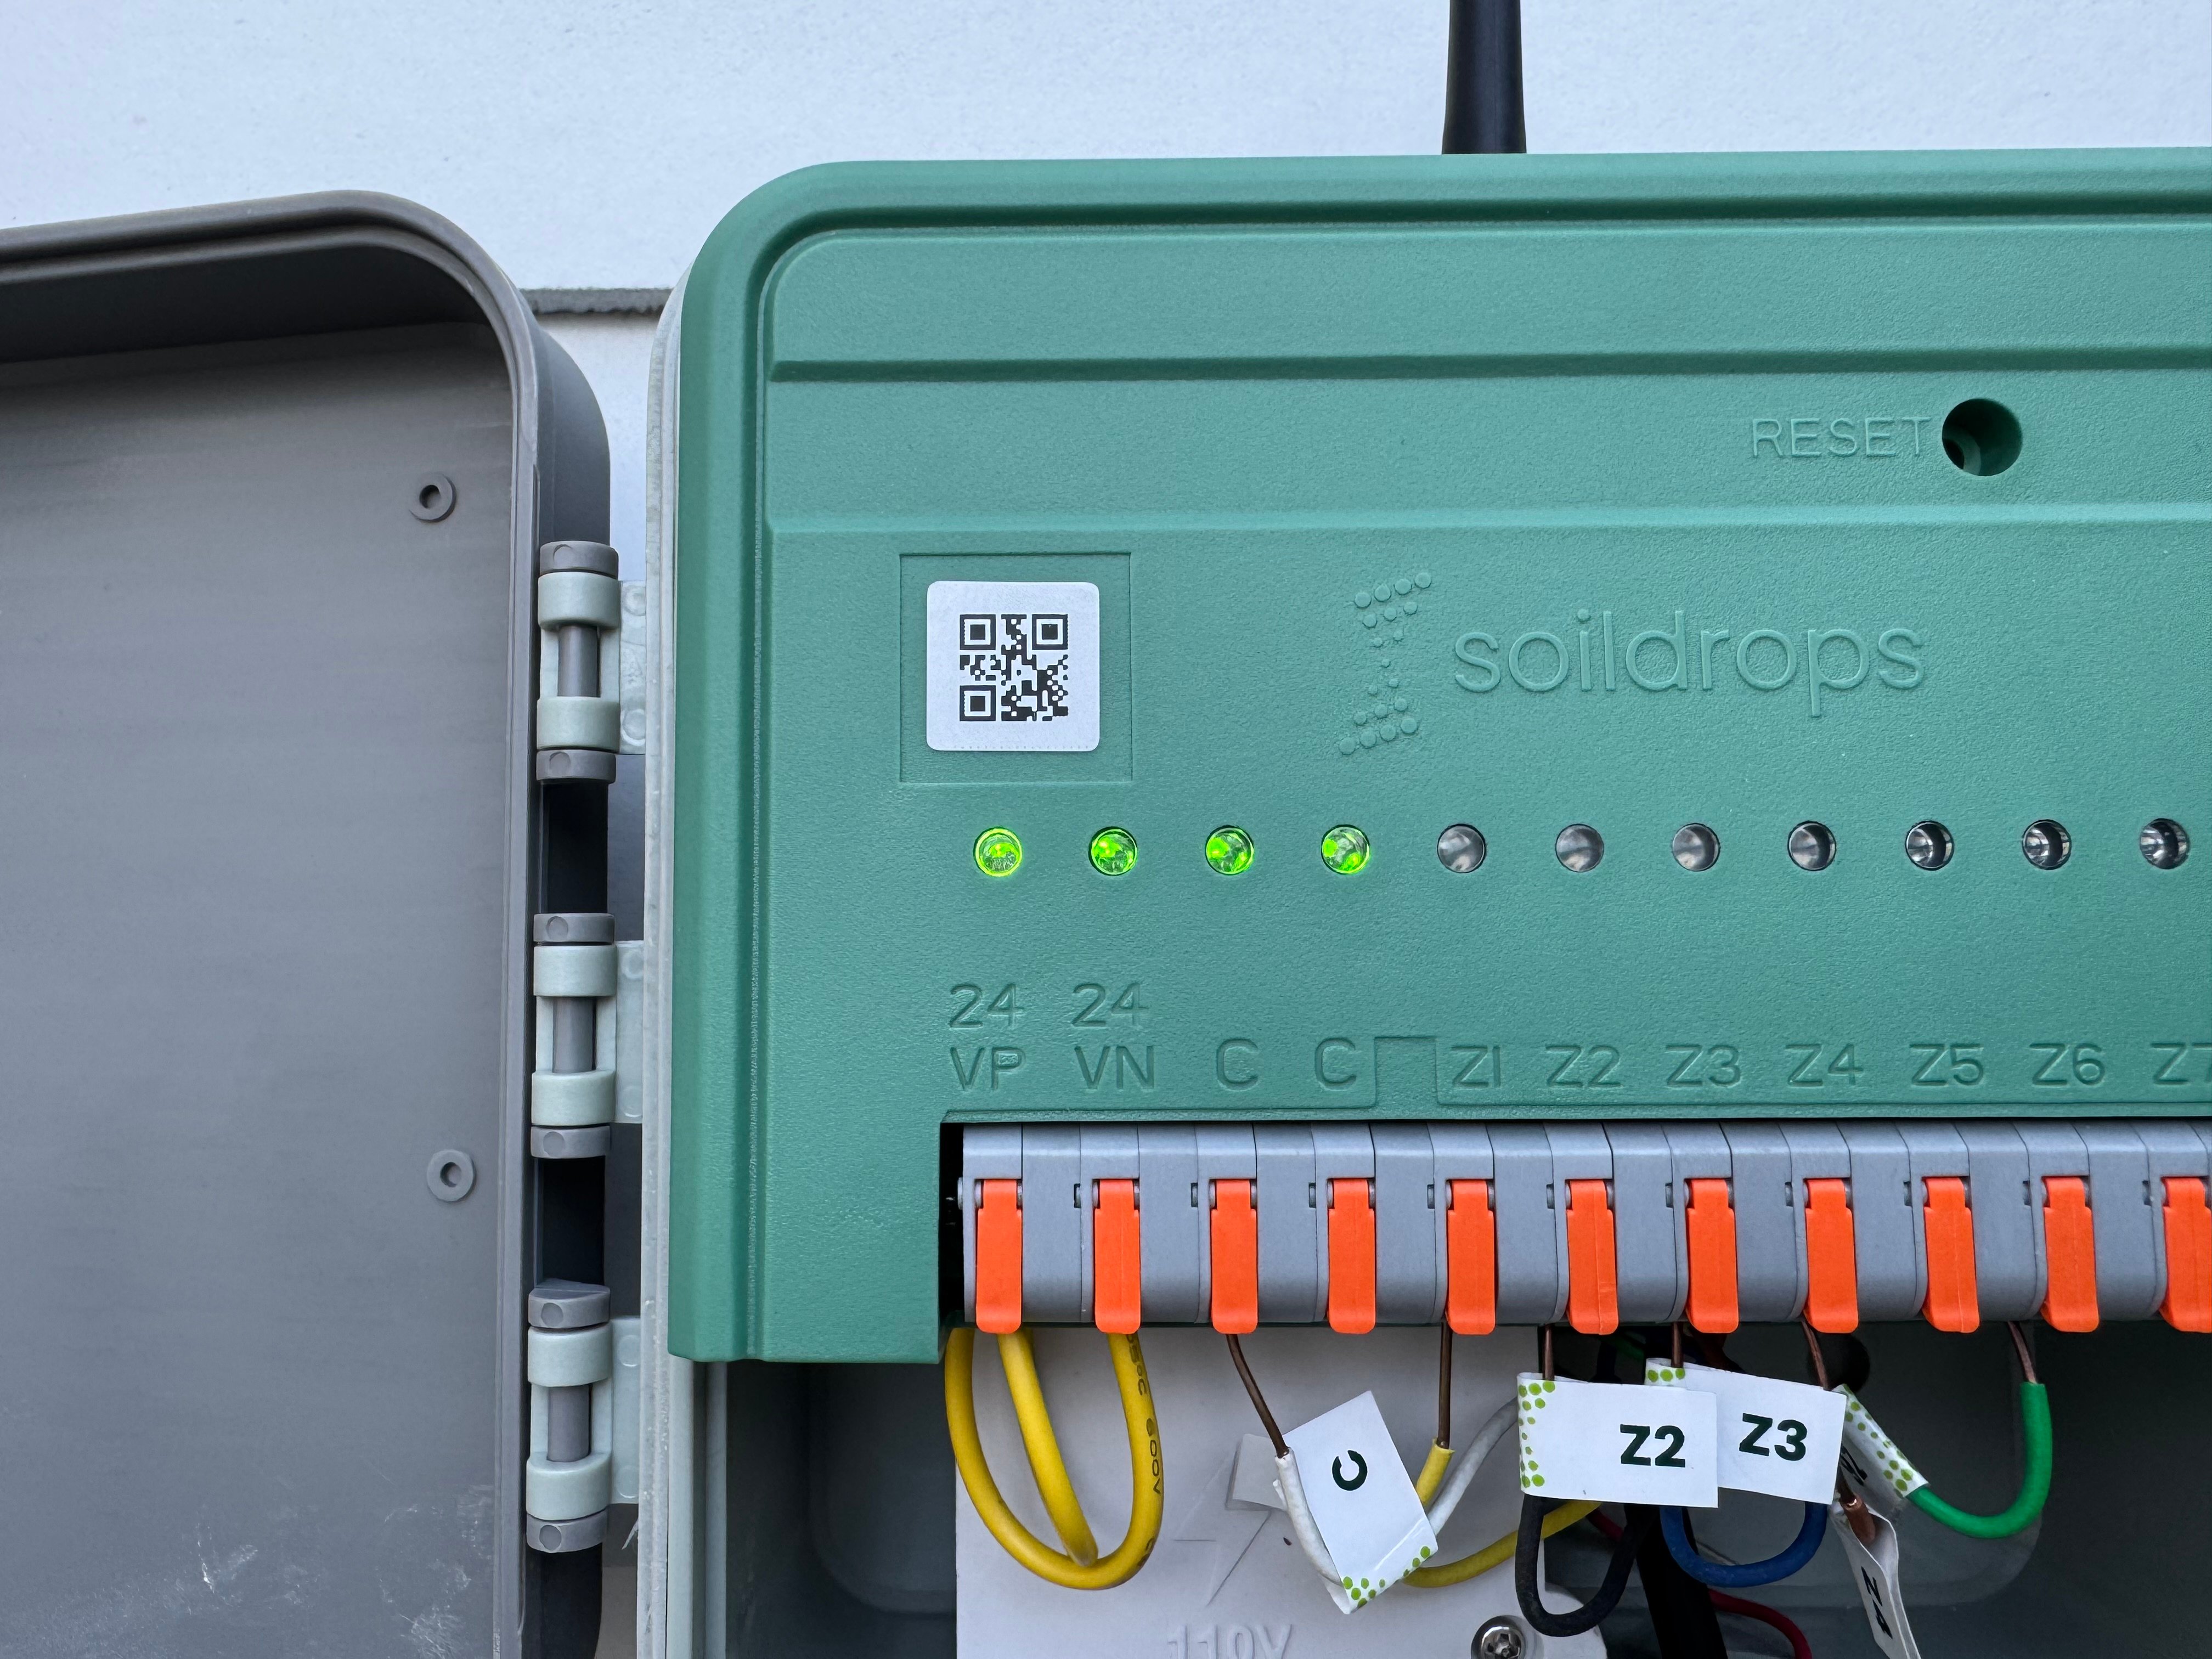
    All 4 LEDs turning on after power-up

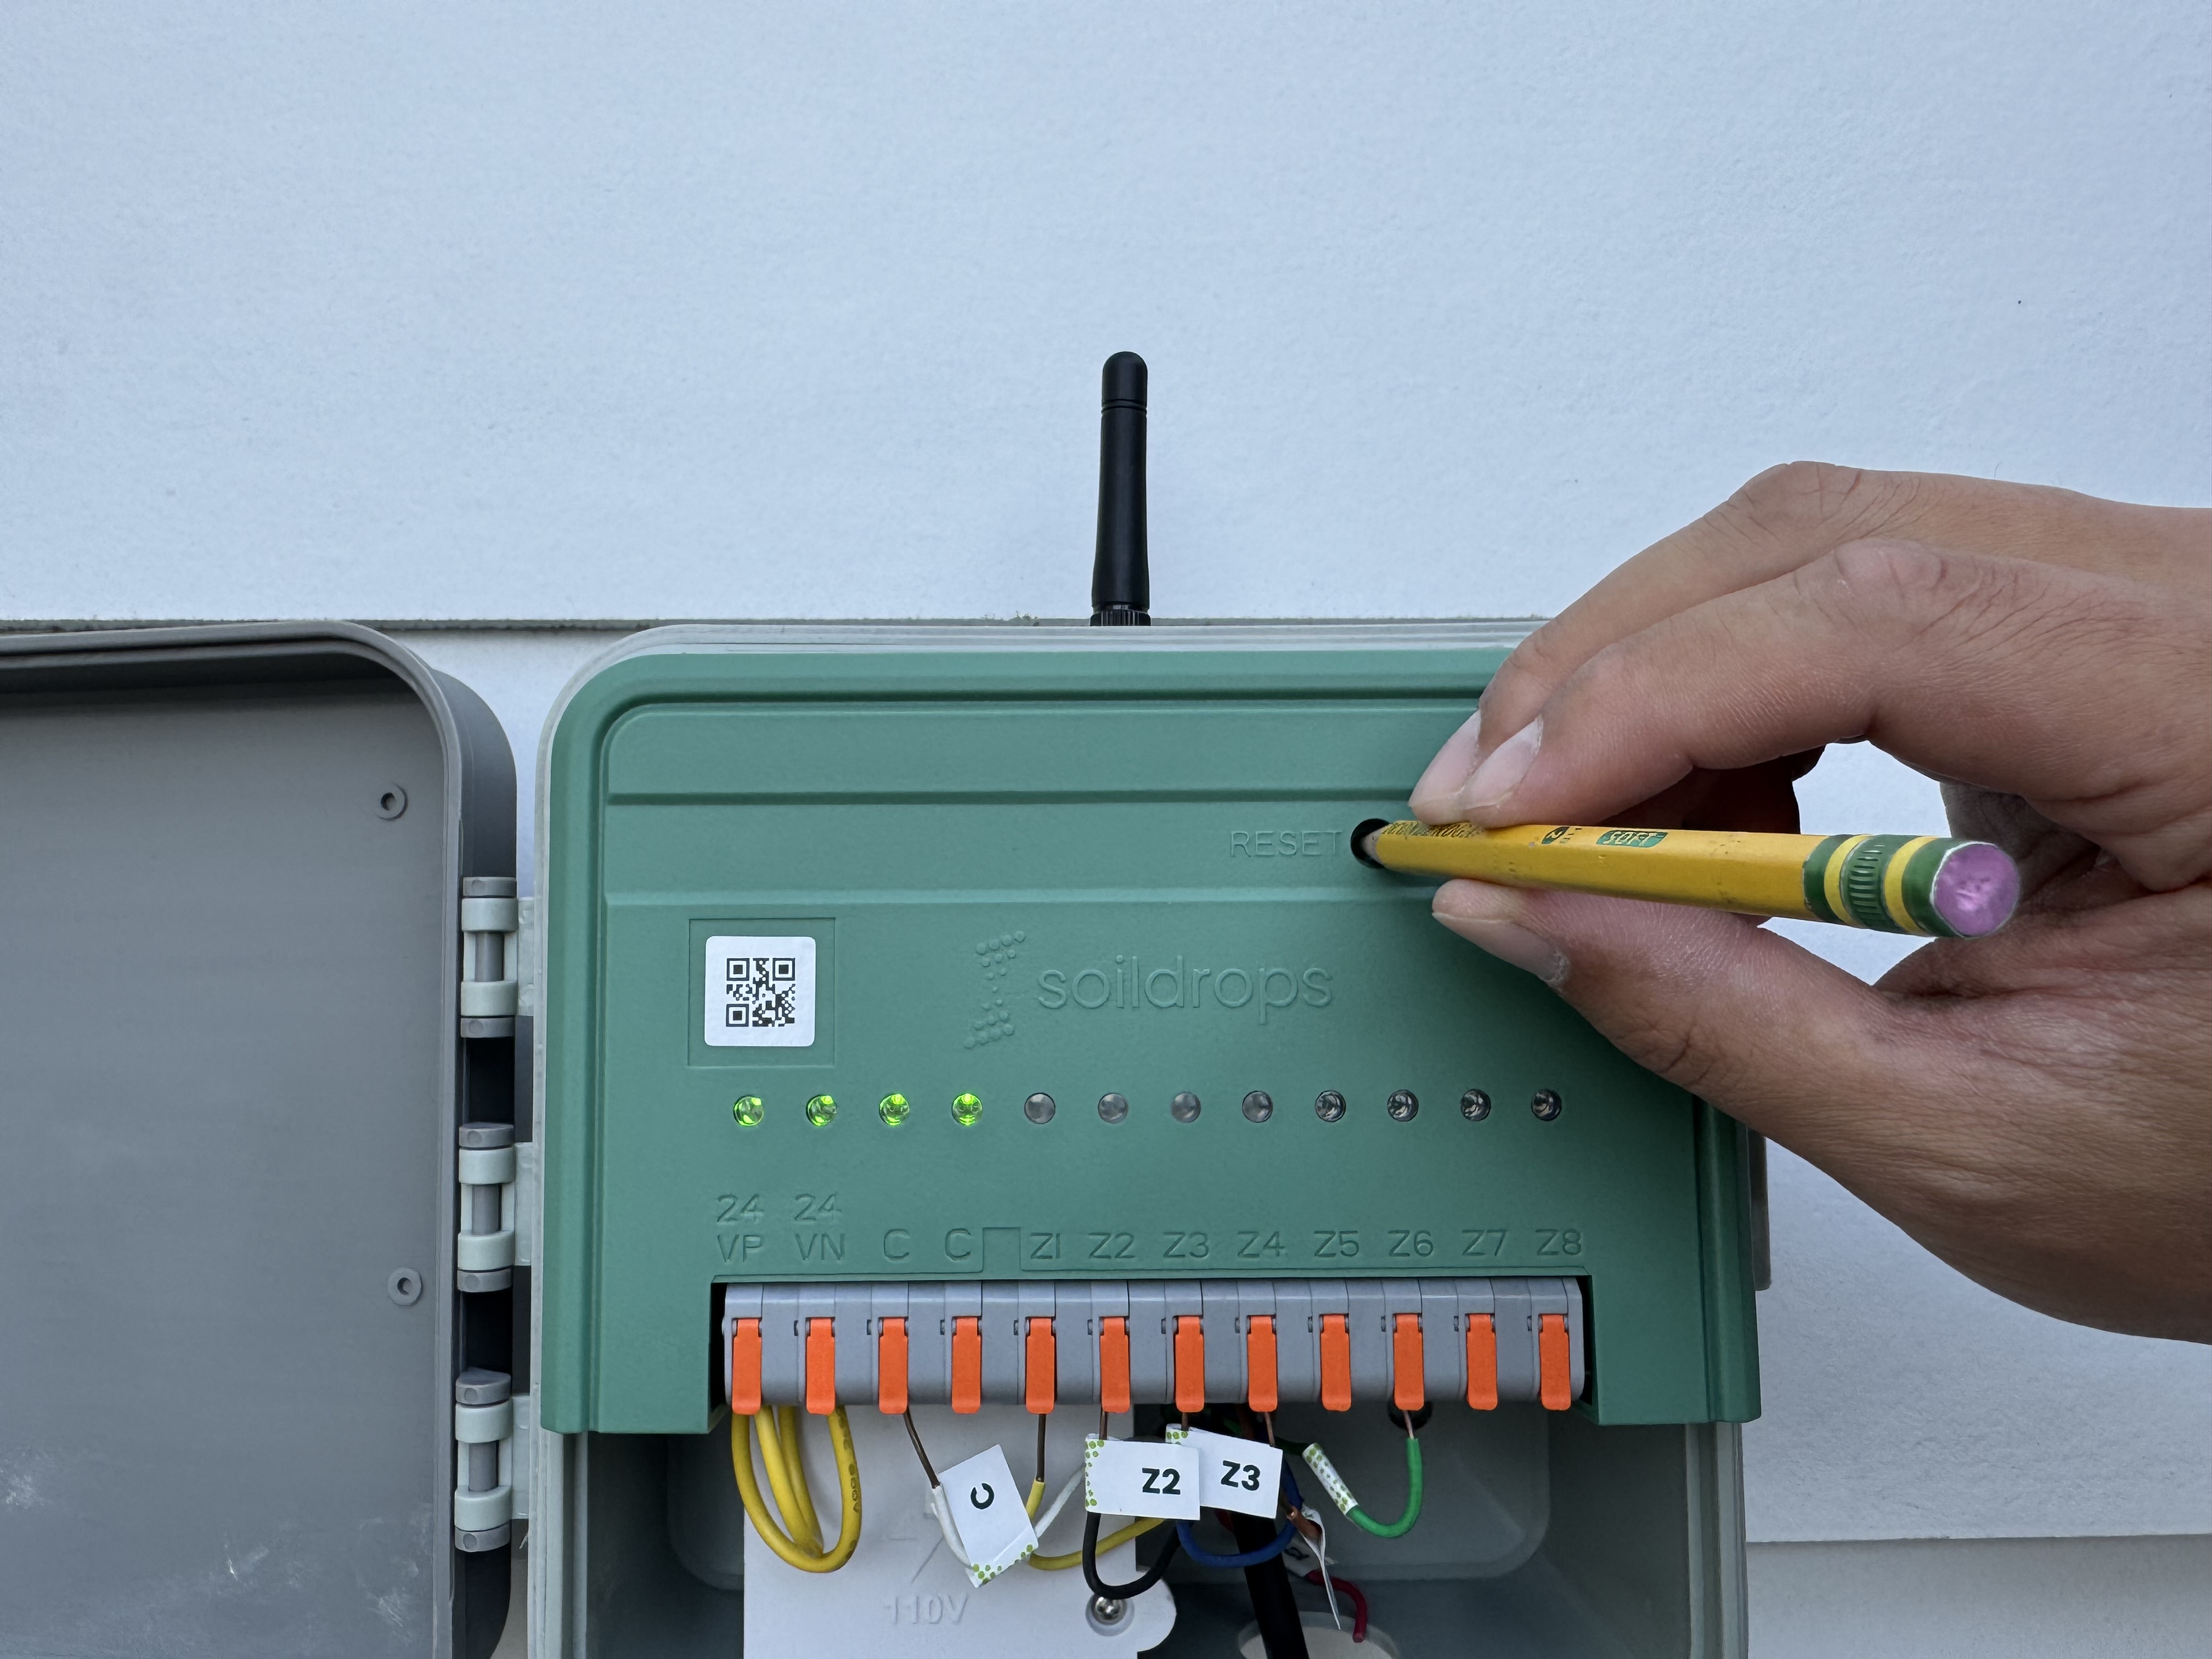
  3. Press and hold the reset button for about 3 seconds, or until the 3rd and 4th LEDs start flashing.
  4. Press and hold reset until 3rd and 4th LEDs flash

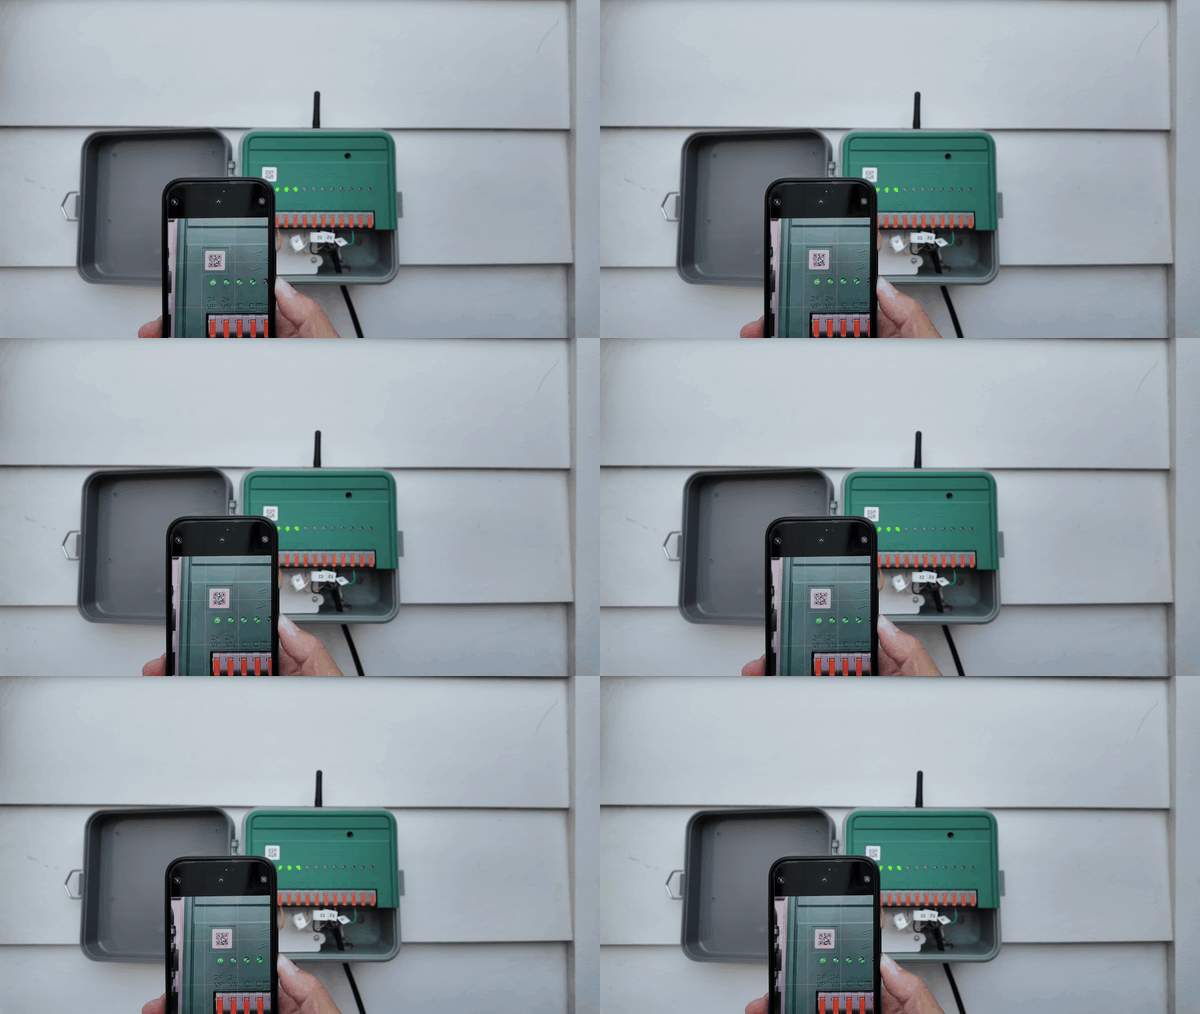
  5. Open the Soildrops app and scan the QR code on the controller to begin pairing.

Scanning the QR code to pair the controller

Tip: Take a photo of your existing wire connections before disconnecting them from your old controller. It makes rewiring much easier.
⬅ Before this step:  Creating Your Soildrops Account

Setting Up Your Soildrops Controller

Your Soildrops Controller is the brain of your smart irrigation system. Once it's mounted and powered, the app walks you through the rest.

Welcome Screen

After creating your account, you'll see a "Welcome aboard!" screen. This is where you select what equipment you're setting up.

Choose Your Equipment

You have two paths:

  • Controller only: Just the controller for smart watering control.
  • Controller + Sensors: Controller plus soil moisture sensors for fully automated Autopilot mode.

Select your setup and tap "Start Setup."

Scanning the QR Code

  1. When prompted, tap the camera icon to scan the QR code on your controller.
  2. Point your phone at the code. You'll see "Scanning device..." and then "Device found!" with a green checkmark.
  3. Tap "Connect" to pair the device.

Connecting to Wi-Fi

  1. Select your home Wi-Fi network.
  2. Enter your Wi-Fi password and tap "Connect."
Important: Your controller requires a 2.4 GHz Wi-Fi network. It won't connect to 5 GHz. If your router broadcasts both, make sure you select the 2.4 GHz band. Look for a network name ending in "2.4G" or check your router settings.

Adding and Configuring Zones

Zones are separate areas of your yard that water independently — each with its own plants, soil type, and schedule. Setting them up correctly helps Soildrops make smarter watering decisions.

What's a Zone?

Each zone represents one irrigation line connected to your controller. For example:

  • Zone 1: Front lawn
  • Zone 2: Side garden beds
  • Zone 3: Backyard trees

Setting Up Your Zones

  1. During setup, you'll see "Set Up Your Zones." Select the number of zones — this should match the number of valve outlets on your controller.
  2. For each zone, you'll configure a few details.

Zone Details

Name: Give your zone a friendly name like "Front Yard" or "Vegetable Garden" so you can identify it at a glance.

Photo: Snap or upload a photo of the zone — optional but handy for remembering what's where.

Spray Head Type: What kind of irrigation does this zone use?

  • Dripline: Soaker hoses or drip irrigation (low volume, slow release)
  • Sprinkler: Pop-up or spray sprinklers
  • Emitter: Individual drip emitters or micro-sprinklers

Your Plants: You can describe what's growing in two ways:

  • By category: Choose a general type (Ornamental Garden, Open Lawn, Turf), then select your soil type and sun exposure.
  • By species: Search for specific plants like "Roses" or "Abutilon hybrids."

Target Moisture: Soildrops suggests an ideal soil moisture percentage based on your plant selections. You can keep this or customize it.

Worth the effort: The more accurately you describe each zone's plants and soil, the better Soildrops' AI can optimize your watering. A few extra minutes here pays off in water savings all season.
⬅ Before this step:  Setting Up Your Soildrops Controller

Master valves and well pumps

The Soildrops controller drives 8 zones plus a common (C) terminal. It does not have a master valve or pump start terminal — there is no M or MV output.

What this means

  • Master valves are not supported. If your system has a master valve, the controller cannot open it.
  • Well pumps are not supported. The controller cannot start a pump, directly or through a pump start relay.

If your irrigation system depends on either one, Soildrops is not the right controller for it. We would rather tell you before you install than after.

More than 8 zones? A second controller covers zones 9–16. Support for managing both from a single app account is launching soon — expected around October 2026.
Not sure whether you have a master valve? Look at your old controller for a terminal labelled M, MV or P/MV with a wire in it. If there is a wire there, your system uses one. Send a photo of the wiring to support@soildrops.com and we will tell you before you take the old unit off the wall.

Features

Understanding the System Overview

The System Overview is your home screen in the Soildrops app — a real-time dashboard showing everything happening across your irrigation system at a glance.

What You'll See

  • Zone cards: Each zone shows its name, current moisture level (if a sensor is paired), and watering status.
  • Active watering indicator: A green animation when a zone is currently running.
  • Weather data: Local temperature, precipitation chance, and weather-based adjustments.
  • System health: Battery levels on sensors, controller connectivity status, and any alerts.

Interacting with Zone Cards

Tap any zone card to see its full detail view — moisture history, scheduled waterings, sensor readings, and zone settings. You can also trigger a quick manual run directly from the card.

Tip: Check the System Overview periodically, especially during hot stretches. It's the fastest way to spot if a zone is drying out or if a sensor needs new batteries.

How Soildrops Saves Water

Soildrops is designed to use less water without compromising your lawn or garden's health. Here's how it does that.

Sensor-Driven Watering

When a soil moisture sensor is paired to a zone, Soildrops knows the actual moisture level in the ground — not a guess based on averages. It only waters when the soil genuinely needs it.

Weather Intelligence

Soildrops pulls local weather data and adjusts automatically. If rain is forecasted, it skips the next watering cycle. If it's been dry and hot, it increases the duration. This happens without you lifting a finger.

Smart Cycle & Soak

Instead of running a long continuous cycle that causes runoff, Soildrops breaks watering into shorter intervals with soak time in between. The water has time to absorb before the next cycle starts.

Seasonal Adjustments

Water needs change throughout the year. Soildrops adapts its schedules based on seasonal patterns — watering more in summer, less in spring and fall, and pausing during winter if configured.

Real-world impact: Most Soildrops users see a 30–50% reduction in water usage compared to traditional timers, with healthier plants as a bonus. The key is in watering smarter, not less — the AI ensures every drop counts.

Watering Modes Explained

Soildrops offers three watering modes, each giving you a different level of automation. You can switch between them anytime from your zone settings.

Autopilot Mode

The most hands-off option. Soildrops uses real-time soil moisture data from your sensor, combined with weather forecasts and plant profiles, to decide when and how long to water. You set the target moisture level — the system handles the rest.

Requires a soil moisture sensor paired to the zone.

Smart Mode

AI-driven watering based on weather data, plant type, soil type, and sun exposure — without needing a sensor. Soildrops calculates when your zone should need water and adjusts for rain and temperature changes.

Good for zones where you haven't installed a sensor yet, or for areas where sensor placement isn't practical.

Manual Mode

You set the schedule — specific days, start time, and duration. Soildrops runs exactly what you tell it to, with no AI adjustments. This gives you full control for situations where you know exactly what your zone needs.

Our recommendation: Start with Smart mode to get going quickly, then upgrade to Autopilot when you add a sensor. You'll see the biggest water savings with Autopilot, since the system reacts to actual soil conditions rather than estimates.

Seasonal Watering Tips

Your yard's water needs change with the seasons. Here's how to get the most out of Soildrops throughout the year.

Spring

Plants are waking up but the soil is often still damp from winter rain. Start with shorter, less frequent watering and let Soildrops ramp up as temperatures rise. This is a good time to check sensor batteries, clean sprinkler heads, and inspect for winter damage.

Summer

Peak watering season. In Autopilot or Smart mode, Soildrops automatically increases duration and frequency based on heat and evaporation. If you're on Manual mode, consider bumping up your run times. Water early (5–7 AM) to reduce evaporation.

Fall

Temperatures cool and rain returns in many areas. Soildrops will start dialing back automatically if you're in Autopilot or Smart mode. Manually reduce your schedules if you're in Manual mode. Late fall is a good time to run a final deep watering before winter.

Winter

In freezing climates, shut down your system entirely — turn off the water supply, drain the lines, and disable schedules. In milder climates, you may only need occasional watering for cool-season grasses or evergreens.

Let the AI handle it: If you're using Autopilot or Smart mode, Soildrops adapts to seasonal changes automatically. You don't need to manually adjust schedules unless you're in Manual mode.

Using the Water Scheduler

The Water Scheduler is where you create, view, and manage your watering programs. Whether you're setting up Autopilot, Smart, or Manual schedules, this is your control center.

Creating a Schedule

  1. Open the Soildrops app and navigate to the zone you want to schedule.
  2. Tap "Schedule" or "Add Schedule."
  3. Select your watering mode (Autopilot, Smart, or Manual).
  4. For Manual mode: choose days, start time, and duration.
  5. For Autopilot/Smart: set your target moisture level and preferred watering window.
  6. Save the schedule.

Managing Schedules

You can have multiple schedules per zone and enable or disable individual programs without deleting them. This is handy for seasonal adjustments — keep a summer and winter schedule, and toggle between them as needed.

Quick Run: Start Watering Instantly

Quick Run lets you water any zone immediately — no schedule needed. It's great for testing sprinkler coverage, giving a new planting an extra drink, or flushing a line after maintenance.

How to Use Quick Run

  1. Open the Soildrops app and go to System Overview.
  2. Tap the zone card you want to water.
  3. Tap the "Quick Run" button.
  4. Set the duration (in minutes) and confirm.
  5. The zone starts watering immediately.

To stop early, tap "Stop" on the zone card. Quick Run doesn't affect your scheduled programs — everything continues as normal afterward.

Skipping and Resuming Watering

Need to pause watering for a day or two? You can skip the next scheduled run without deleting or changing your program.

How to Skip

  1. Open the Soildrops app and go to the zone you want to skip.
  2. Tap "Skip Next Watering" or the skip icon.
  3. The next scheduled run for that zone will be skipped. Future schedules continue as normal.

How to Resume

If you change your mind, go back to the zone and tap "Resume" or cancel the skip. The schedule will run as originally planned.

When to use this: Skip is ideal after a rain shower, after manual watering, or before a lawn party when you don't want the sprinklers to come on unexpectedly.

Smart Cycle & Soak

Smart Cycle & Soak prevents water runoff by breaking a long watering session into shorter cycles with pause time between them. Instead of dumping all the water at once, it gives the soil time to absorb each round before adding more.

How It Works

Let's say your zone is scheduled for 20 minutes. Instead of running the full 20 straight, Soildrops might break it into:

  • 7 minutes of watering
  • 15 minutes of soaking (the valve closes, water absorbs)
  • 7 minutes of watering
  • 15 minutes of soaking
  • 6 minutes of watering

The total run time is still 20 minutes — it's just spread out so the water goes into the soil instead of running down the street.

When Is It Most Useful?

  • Clay soil: Clay absorbs water very slowly. Without soak time, most of the water pools on the surface or runs off.
  • Slopes: Gravity pulls water downhill before it can absorb. Shorter cycles with pauses reduce this dramatically.
  • Compacted soil: Older lawns with compacted soil resist water penetration. Cycle & Soak gives it time to work its way in.
Automatic: Smart Cycle & Soak is enabled by default in Autopilot and Smart modes. The system calculates optimal cycle lengths based on your soil type and spray head type — no manual configuration needed.

Weather Intelligence & Weather Skip

Soildrops monitors local weather conditions and automatically adjusts your watering to match. Rain coming? It skips the cycle. Heat wave? It adds a little extra. You don't have to do anything.

How Weather Skip Works

Before each scheduled watering, Soildrops checks the local forecast. If significant rain is expected (or has just occurred), it skips the cycle and notifies you in the app. Once conditions dry out, watering resumes normally.

Weather-Based Adjustments

Beyond simple skip/don't-skip, Soildrops also fine-tunes:

  • Temperature: Higher temps increase watering duration; cooler temps reduce it.
  • Wind speed: High wind causes sprinkler drift and evaporation — Soildrops may delay watering to calmer conditions.
  • Humidity: Lower humidity means faster evaporation and higher water demand.
Note: Weather Intelligence works in all three watering modes (Autopilot, Smart, and Manual). In Manual mode, it only applies weather skips — it won't change your programmed duration or frequency.

Smart Skip: Weather & Moisture Skip

Soildrops can automatically skip a scheduled watering when your plants don’t need it. There are two ways this happens — Weather Skip (based on the forecast) and Moisture Skip (based on real-time soil readings). Both only apply to scheduled watering and won’t affect Quick Run.

Weather Skip

Before a scheduled watering runs, Soildrops checks the local weather forecast for your area. If enough rain is expected that day, the watering is skipped automatically and you’ll get a notification in the app.

To use Weather Skip, you’ll need:

  1. The Weather Skip toggle turned on in your schedule settings.
  2. A saved location in your account (so the system knows where to check weather).
Note: Weather Skip works in all watering modes. In Manual mode, it only skips cycles — it won’t change your programmed duration or frequency.

Moisture Skip

If a soil moisture sensor is paired to a zone, the controller checks the current soil moisture right before a scheduled watering starts. If the soil is already wet enough, the watering is skipped automatically.

This decision happens entirely on the controller — your sensor sends its reading directly to the controller over a local connection.

The skip threshold is based on the Target Moisture you’ve set for the zone, plus a small buffer. So if your target moisture is 45%, the controller will skip watering when the soil reads 50% or above.

To use Moisture Skip, you’ll need:

  1. A moisture sensor paired to the zone.
  2. A Target Moisture value set for that zone.
  3. The zone must not be paused.
Tip: Moisture Skip is the last check before water turns on. It only runs if the schedule wasn’t already skipped by Weather Skip or a manual skip.

Which Skip Happens First?

Weather Skip is checked first. If rain is expected, the watering is skipped before the controller even evaluates soil moisture. Moisture Skip only kicks in if Weather Skip didn’t apply — it’s the last check before the water actually turns on.

Notifications

Whenever a watering is skipped, you’ll receive a push notification and an in-app notification telling you which zone was skipped and why (rain or soil moisture).

Zone Management

Viewing Zone Details and Irrigation Insights

Each zone has a detail view showing everything Soildrops knows about it — current conditions, recent history, and upcoming activity.

What You'll See

  • Current moisture level: The real-time reading from your sensor (if paired), displayed as a percentage.
  • Target moisture: The ideal range you've set for this zone's plants.
  • Next watering: When the next scheduled or AI-triggered watering is expected.
  • Recent watering history: A log of past sessions with dates, durations, and whether they were scheduled, manual, or skipped.
  • Sensor health: Battery level and signal strength for paired sensors.

Tap any section to drill deeper into historical data, trends, and irrigation insights.

Add Zone & Schedule

You can add new zones to your controller at any time — you're not limited to what you set up during initial configuration.

Adding a Zone

  1. Open the Soildrops app and go to System Overview.
  2. Tap "+" or "Add Zone."
  3. Enter a zone name, select your spray head type, plant type, soil type, and sun exposure.
  4. Review the suggested target moisture level (or customize it).
  5. Tap "Save."

Setting Up a Schedule

  1. From the new zone's detail screen, tap "Schedule" or "Add Schedule."
  2. Choose your watering mode (Autopilot, Smart, or Manual).
  3. For Manual: set specific days, start time, and duration.
  4. Tap "Save" to activate.
No rush: You can add a zone now and configure its schedule later. Zones without a schedule simply stay idle until you're ready.

Editing Zone Information

As your garden evolves — new plants, different soil amendments, changed sun exposure — you can update zone details at any time to keep Soildrops' AI accurate.

How to Edit

  1. Open the Soildrops app and tap the zone card you want to edit.
  2. Tap the settings/gear icon.
  3. Update any field — name, photo, spray head type, plant type, soil type, sun exposure, or target moisture.
  4. Save your changes.
Why it matters: The AI uses these details to calculate how much water your zone needs. If you've replaced your lawn with drought-tolerant plants, updating the zone info lets the system adjust accordingly — sometimes dramatically reducing water use.

Edit Manual Schedule

You can modify any manual schedule at any time — adjust days, start times, or durations as your garden's needs change through the season.

How to Edit

  1. Open the Soildrops app and tap the zone card.
  2. Tap "Schedule" to see active schedules.
  3. Tap the schedule you want to change.
  4. Adjust days, start time, or duration.
  5. Tap "Save."

Deleting a Schedule

Open the schedule and tap "Delete Schedule." The zone stops watering on that program but keeps any other active schedules.

Seasonal Adjustment Tips

  • Summer: Increase frequency and duration as temperatures climb.
  • Winter: Reduce frequency or pause schedules during dormant months.
  • After rain: Skip a cycle or reduce duration for a few days.
  • New plants: Water more often for the first 2–4 weeks while roots establish.
Consider Smart mode: If adjusting manual schedules feels like too much upkeep, try switching to Smart mode — the AI calculates an optimal plan based on your zone's profile and local weather.

Understanding Soil Moisture Levels

Soil moisture percentage is the core metric Soildrops uses to decide when and how much to water. Understanding what the numbers mean helps you make the most of the system.

What Do the Numbers Mean?

  • 0–15%: Very dry. Most plants are stressed at this level.
  • 15–30%: Dry. Watering is likely needed for most plant types.
  • 30–50%: Ideal range for most gardens. Plants are hydrated but not waterlogged.
  • 50–70%: Moist. Fine for water-loving plants, but many species prefer less.
  • 70%+: Saturated. Risk of root rot for most plants. Reduce watering.

Target Moisture

When you set up a zone, Soildrops suggests a target moisture percentage based on your plant type. In Autopilot mode, the system waters when moisture drops below this target and stops when it's reached.

Fine-tuning: If your plants look great, leave the target alone. If they seem stressed or overwatered, adjust the target by 5% and observe for a week before changing further. Small adjustments go a long way.

Delete Zones

If you no longer need a zone — maybe you've removed an irrigation line or want to reorganize — you can delete it from the app.

How to Delete

  1. Open the Soildrops app and tap the zone card you want to remove.
  2. Tap the settings/gear icon.
  3. Scroll down and tap "Delete Zone."
  4. Confirm when prompted.
This is permanent. Deleting a zone removes its schedules, moisture history, and sensor pairing. If you have a sensor on this zone, you'll need to re-pair it to a new zone later.
Alternative: If you just want to temporarily stop watering a zone, pause or skip it instead of deleting. This preserves all your settings and data.

Configuring AI-Watering Settings

In Autopilot and Smart modes, you can fine-tune how the AI handles your watering. These settings give you control without having to micromanage schedules.

Key Settings

  • Target moisture level: The soil moisture percentage the AI aims to maintain. Lower targets mean less watering; higher targets mean more.
  • Watering window: The hours during which the system is allowed to water (e.g., 5–8 AM only). This prevents watering during high-traffic times or peak sun.
  • Max run time: An upper limit on how long a single watering session can last.

How to Adjust

  1. Go to the zone's detail view.
  2. Tap "AI Settings" or "Watering Preferences."
  3. Make your adjustments and save.
Start with defaults. Soildrops' recommended settings work well for most gardens. Give them a week or two before tweaking — the AI needs time to learn your zone's unique absorption patterns.

Setting Up Manual Schedules

Manual schedules give you complete control — you decide exactly which days, what time, and how long each zone waters. The system runs your program as-is, with no AI adjustments (though weather skip still applies).

How to Set Up

  1. Open the zone's detail view and tap "Schedule."
  2. Select "Manual" as the watering mode.
  3. Choose the days of the week you want to water.
  4. Set the start time.
  5. Set the duration (how many minutes).
  6. Save.
When Manual makes sense: New sod that needs a precise schedule, areas with strict HOA watering rules, or zones where you know from experience exactly what works. For everything else, Smart or Autopilot mode will likely give you better results with less effort.

Adjusting Your Start Time

The start time determines when your watering cycle begins. Choosing the right time makes a real difference in water efficiency and plant health.

How to Change It

  1. Open the zone's schedule settings.
  2. Tap the start time field.
  3. Select a new time and save.

Best Practices

  • Early morning (5–7 AM) is ideal. Temperatures are low, wind is calm, and there's less evaporation. Plants absorb moisture before the heat of the day.
  • Avoid midday watering. High heat and sun cause rapid evaporation — much of the water never reaches the roots.
  • Evening is okay but not ideal. Water sitting on leaves overnight can promote fungal diseases in some climates.

A zone is watering more than you expect

If a zone runs longer or more often than seems right — or your water bill jumped after setup — adjust what the system is aiming for, not the run time. In Autopilot, run length is calculated from the zone's Target Moisture, so lowering the target is what actually reduces watering; editing the duration just gets recalculated away.

Adjusting Target Moisture

  1. Open System in the app and select the zone.
  2. Tap the edit (pen) icon.
  3. Choose "Customize soil moisture level" and lower the target a step at a time.

The app shows a recommended level for the plant type you selected — that is the reference point. Lower the target gradually and give the system a few days between changes to settle.

Also worth checking

  • Mixed plantings: a zone waters for its thirstiest plant type. If a zone mixes lawn with shrubs, the lawn setting governs — consider whether the plant selection matches what is really there.
  • Just set up? Give the AI about 24 hours to build its first plan before judging it.
  • Manual schedules: if the zone runs on a manual schedule, check its duration and selected days directly — Target Moisture only drives Autopilot.
  • Suspect a leak or a stuck valve? If a zone seems to run far beyond any schedule, walk the zone during a Quick Run and look for heads that keep flowing after it ends. Email support@soildrops.com if something looks wrong — we can pull the zone's run history from our side.

Settings

Controller Settings: Firmware, Reset & Wi-Fi

The Settings screen in the app is where you manage firmware updates, Wi-Fi configuration, and device resets.

Firmware Updates

When a new firmware version is available, you'll see a notification in the app. Tap "Update" to install. Updates improve performance, add features, and fix bugs. We recommend always keeping your controller up to date.

Wi-Fi Settings

If you change your Wi-Fi network or password, you'll need to reconnect the controller. Go to Settings → Wi-Fi, select your new network, enter the password, and save.

Factory Reset

A factory reset clears all settings and returns the controller to its out-of-box state. Use it only as a last resort for persistent issues, or when transferring the controller to a new owner — contact support before you reset, since most problems can be fixed without it.

  1. On the controller, press and hold the reset button for 12 seconds. Keep holding for the full 12 seconds — letting go early is the most common reason a reset doesn't take.
  2. The LEDs will flash, confirming the reset.
  3. Wait 1–2 minutes for the controller to finish restarting.
  4. Re-pair the controller through the app as if it were new.
Warning: A factory reset wipes the controller's account link and its entire hardware configuration — zone setup, schedules, and sensor pairings are all deleted and have to be created again. Back up any schedule details you want to recreate, and email support@soildrops.com first.

Managing offline alerts and other notifications

Soildrops can notify you when watering starts and finishes, when a scheduled run is skipped for weather, when a sensor battery runs low, and when the controller goes offline. Every one of these can be switched on or off individually.

Turning alerts on or off

  1. Open the Soildrops app.
  2. Go to Account SettingsNotifications.
  3. Toggle each notification type to your liking.

About offline alerts specifically

The offline alert exists because a controller that silently drops off Wi-Fi can miss scheduled waterings without you knowing. That said, if your controller lives on a connection that dips briefly and recovers — and your lawn is fine — the alerts can be more noise than help. Turning them off is a perfectly reasonable choice.

Still getting alert emails after turning the toggle off? Reply directly to the alert email or write to support@soildrops.com and we will switch them off for your account on our side.
Getting offline alerts often? That is worth a look — see Controller Offline: What to Do.

Account & Sharing

Managing Your Subscription

Soildrops' core features are available for free. If you're on a premium plan, here's how to manage your subscription.

Viewing Your Plan

  1. Open the Soildrops app.
  2. Go to Account Settings"Subscription."
  3. View your current plan, billing cycle, and renewal date.

Changing or Canceling

Subscription changes are handled through the app Store (iPhone) or Google Play (Android). Tap "Manage Subscription" in the app to be directed to the right place.

Note: If you cancel, your premium features remain active until the end of the current billing period. Your controller, zones, and basic scheduling continue to work without a subscription.

Editing Your Profile and Password

Keep your account details current — especially your email, since that's how we'll reach you for support and password resets.

How to Edit

  1. Open the Soildrops app and go to Account Settings.
  2. Tap "Profile" to update your name or email.
  3. Tap "Change Password" to update your password. You'll need to enter your current password first.

Inviting and Managing Gardeners

Want your partner, roommate, or landscaper to have access to your system? You can invite other people as "Gardeners" — they'll be able to view and control your zones from their own phone.

How to Invite

  1. Open the Soildrops app and go to Account Settings"Gardeners."
  2. Tap "Invite" and enter their email address.
  3. They'll receive an invite to download the app and connect to your system.

Managing Access

You can remove a gardener's access at any time from the same screen. They'll lose the ability to view or control your system immediately.

Use case: If your landscaper manages your irrigation, giving them gardener access lets them adjust schedules and run zones without needing your phone.

Notifications

Stay informed about what your irrigation system is doing — without constantly checking the app.

Available Notifications

  • Watering started/completed: Know when each zone runs and finishes.
  • Weather skip: Notified when a scheduled watering is skipped due to rain or weather conditions.
  • Low battery: Alerts when a sensor's battery is running low.
  • Controller offline: Notified if the controller loses Wi-Fi connectivity.
  • Leak detected: If unusual water flow is detected, you'll be alerted immediately.

Managing Notifications

Go to Account Settings"Notifications" to toggle individual notification types on or off. We recommend keeping at least the leak detection and offline alerts enabled.

What's free and what needs a subscription

Your Soildrops controller works without any subscription. One feature — Autopilot — is a paid add-on.

Free, forever, with the hardware

  • App and web control of every zone
  • Manual schedules — your own days, times and run lengths
  • Quick Run
  • Live soil moisture and temperature readings from your sensors
  • Weather Skip — skipping a scheduled watering when rain is forecast
  • Moisture Skip — skipping a scheduled watering when the soil is already wet enough
  • Notifications, zone history and sensor health

Autopilot — $60 per year

Autopilot is the mode where the AI decides watering for you: it reads your soil moisture and the local forecast and writes the schedule itself, adjusting run lengths day to day instead of following a fixed program.

That runs on our servers, not on the controller — continuously modelling each zone and re-planning as conditions change. The subscription covers that computing cost.

If you don't subscribe: nothing stops working. Your zones, schedules, sensors and skips keep running exactly as before — you just set the watering plan yourself instead of having the AI write it.

To view or change your plan, see Managing Your Subscription.

Troubleshooting

Controller Offline: What to Do

If the app shows your controller as "Offline," it means it can't communicate with Soildrops' servers. Here's how to get it back online.

What the LEDs Are Telling You

The four LEDs on the front of the controller are the fastest way to see where it is stuck.

  • All 4 LEDs on: the controller is connected to Wi-Fi and online.
  • 3rd and 4th LEDs on: the controller is in pairing mode, waiting to be added from the app.
  • First 2 LEDs on: the controller has power but is not connected — work through the steps below.

Troubleshooting Steps

  1. Check your Wi-Fi. Make sure your home network is working — try loading a web page on your phone. If the internet is down, the controller will reconnect automatically when it comes back.
  2. Check the Wi-Fi signal where the controller is mounted. Distance alone doesn't tell you much — what matters is what sits between the controller and the router. Stucco with wire lath, a metal garage door, foil-backed insulation, or a masonry wall can cost you more signal than an extra 50 feet of open air. Quickest test: stand at the controller with your phone and check your Wi-Fi there. If it's weak or keeps dropping, the controller will have the same problem — move the router, or add a mesh node or extender closer to it.
  3. Power cycle the controller. Unplug it for 30 seconds, then plug it back in. Give it 1–2 minutes to reconnect.
  4. Verify your Wi-Fi password hasn't changed. If you recently updated your Wi-Fi password, the controller won't be able to reconnect. Go to Settings → Wi-Fi in the app to update it.
  5. Check for firmware updates. An outdated firmware version can occasionally cause connectivity issues.

Factory Reset — Last Resort Only

Holding the reset button for 12 seconds factory resets the controller. Only do this if none of the steps above worked, and talk to support first — we can usually get a controller back online without resetting it. Full steps are in Controller Settings: Firmware, Reset & Wi-Fi.

Warning: A factory reset wipes the controller's account link and its entire hardware configuration — zone setup, schedules, and sensor pairings all have to be created again. Email support@soildrops.com before you reset.
Good news: While the controller is offline, any schedules already saved to it continue to run normally. You just can't make changes or use manual control from the app until the connection is restored.

Switching Between Devices Coming Soon

Managing multiple Soildrops controllers from one app account — one for the front yard, one for the backyard — is launching soon, expected around October 2026.

Today the app manages one controller per account.

What it will do

  • A device selector at the top of System Overview to switch between controllers.
  • Adding a second controller through the normal setup flow — scanning its QR code will add it alongside your existing device instead of replacing it.
Running two controllers today? Email support@soildrops.com and we will help you set them up so the move to multi-controller support is seamless when it ships.

My schedule didn't run at the time I set

When a schedule does not fire, it is usually a setting rather than a fault. Work down this list in order.

  1. Check AM vs PM. This is the single most common cause. A schedule set for 12 PM instead of 12 AM runs twelve hours off.
  2. Check the selected days. Open the schedule and confirm the days you want are actually ticked under Select Days. A schedule with no days selected never runs.
  3. Check the run duration. A zone set to 0 minutes is effectively off.
  4. Check whether schedules are paused. Settings → Zones → Pause All Schedules stops everything, and it is easy to forget it was turned on.
  5. Refresh the app. Pull down on the calendar page after any change — the app can show a stale view of the schedule.
  6. Confirm the controller is online. All four LEDs solid means it is connected. If not, see Controller Offline: What to Do.
Edits do not apply retroactively. If you change a schedule after today's start time has already passed, the change takes effect tomorrow — it will not trigger a run today.

It ran, just not when you expected

If the zone watered at a different time than scheduled, a skipped and rescheduled watering is the usual cause. Check your notifications — every Weather Skip or Moisture Skip sends one naming the zone and the reason.

Just finished setup? Give the system about 24 hours to generate its first watering plan before judging its behaviour.

Setup can't connect the controller (or stalls at 16%)

If the app cannot find or connect your controller during setup — or the progress bar stalls partway, often around 16% — work through these in order. The first two cover most cases.

QR Code Scans but Pairing Fails? Check the LEDs First

If the scan itself isn't going through — or scanning succeeds but the controller is never found — look at the four LED indicators on the controller before anything else. They tell you exactly what state it's in:

  • All 4 LEDs blinking: the controller is not in pairing mode. Restart it, wait 2–3 minutes, then start setup again in the app so it enters pairing mode before you scan.
  • 3rd and 4th LEDs blinking: it is in pairing mode — keep it in pairing mode and simply scan the QR code again. Wipe the code clean, use good lighting, and hold the phone steady.
  • Any other LED pattern: restart the controller, wait 2–3 minutes, re-enter pairing mode, then scan again.
  1. Make sure you scanned the QR code on the controller, not on a sensor. They look similar, and this is the single most common setup mistake. The controller's code is on the unit itself.
  2. Get on 2.4 GHz. The controller does not support 5 GHz. Routers from T-Mobile, Spectrum and many mesh systems broadcast both bands under one network name, and your phone may silently hand the setup over to 5 GHz. In your router's app or admin page, either separate the bands into two network names or temporarily turn off the 5 GHz band, then join the 2.4 GHz network and retry. (On T-Mobile: T-Life app → Network → "+" → set Frequency Band to 2.4 GHz, security WPA/WPA2.)
  3. Confirm the controller is in pairing mode. The 3rd and 4th LEDs should be flashing. If not, press and hold the reset button for 3 seconds.
  4. Re-enter the Wi-Fi password carefully. It is case-sensitive, and a single wrong character fails silently.
  5. Reset and retry. Press and hold the reset button for 12 seconds, wait 1–2 minutes, then start setup again from the app.
  6. Reinstall the app and try once more.
Workaround for stubborn routers: pair the controller using your phone's hotspot first. Once it is online, accept any firmware update the app offers, then switch it to your home network via Settings → Wi-Fi.
Still stuck? Email support@soildrops.com with a screenshot of the exact screen where setup stops, whether you are on iPhone or Android, and your router model. We can check the controller's connection logs from our side.

Stop watering right now

Need the water off this second? Here is the fastest path, then what to do if the app does not respond.

1. Stop the running zone

Open the app, find the zone that is running, and tap Stop on the zone card. This works for Quick Run and scheduled runs alike.

2. If Stop seems to do nothing — check your phone's connection first

Your Stop command travels from your phone to the cloud, then to the controller. If you are standing in the yard with one bar of signal, the command may never have left your phone. Check that your phone has working Wi-Fi or cellular — try loading a web page. If it loads slowly or not at all, move to where the signal is better and tap Stop again.

3. Connection is fine but the app still will not react

The app can briefly show a stale picture of what is running. Force-close the app and reopen it — the zone's real state refreshes, and Stop will register.

4. It is raining and you want to skip what is coming

Stopping the current run does not change the schedule. To skip the next run, open the zone's schedule and use Skip. For extended rain, Settings → Zones → Pause All Schedules pauses everything until you turn it back on — nothing is deleted.

For next time: turn on Weather Skip in your schedule settings and make sure your account has a saved location — forecast rain will then skip runs automatically. A sudden shower the forecast missed will not trigger it, which is what the steps above are for.

5. Nothing works and water is still flowing

Unplug the controller. Without power, all valves close — your zones, schedules and pairings are saved and come back when you plug it in. If water keeps flowing even with the controller unplugged, a valve is mechanically stuck open: shut off your irrigation water supply and email support@soildrops.com.

FAQ

What are the Wi-Fi requirements for the controller?

The SoilDrops controller requires a 2.4GHz Wi-Fi connection (not compatible with 5GHz networks). However, it doesn’t need much bandwidth—just a basic, stable signal is enough for it to stay connected and operate efficiently. For best performance, ensure the controller is within range of your router or consider using a Wi-Fi extender if needed.

What if I have different plant types in the same zone?

No problem! In the SoilDrops app, you can add all the plant types in your zone, and our AI will automatically select the highest soil moisture requirement to ensure proper watering.

Want more control? You can also customize your ideal soil moisture levels in the app to match your specific preferences.

Frequently Asked Questions

Quick answers to the questions we hear most about the Soildrops Controller.

What are the Wi-Fi requirements?

The controller requires a 2.4 GHz Wi-Fi network. It won't connect to 5 GHz. Most modern routers broadcast both bands — just make sure you select the 2.4 GHz option during setup.

Is Soildrops compatible with my current irrigation system?

Yes. Soildrops works with most standard residential irrigation systems that use 24V AC solenoid valves — which is the vast majority of installed systems. If you have a traditional timer/controller now, Soildrops will almost certainly work as a drop-in replacement.

What if I have different plant types in the same zone?

Since each zone runs on one schedule, group plants with similar water needs together. If that's not possible, configure the zone based on the thirstiest plant type so nothing gets under-watered. Consider adding a second zone for plants with significantly different needs.

Can I manually control the system?

Absolutely. You can run any zone on demand using Quick Run in the app, or switch a zone to Manual mode where you set fixed days, times, and durations.

How does AI scheduling work?

In Autopilot mode, the AI uses real-time soil moisture data (from your sensor), weather forecasts, plant profiles, and soil type to determine when and how long to water. In Smart mode, it uses weather and plant data without a sensor. Both modes continuously analyze conditions and optimize watering based on real-time data.

How much water can I save?

Most users see 30–50% water savings compared to traditional timer-based systems. The exact amount depends on your previous watering habits, climate, and whether you're using sensors for Autopilot mode.

Why does Soildrops allow each zone to water only once per day?

Deep, infrequent watering produces healthier root systems than frequent shallow watering. When you water once per day (or less), roots are encouraged to grow deeper into the soil to find moisture — making plants more drought-tolerant and resilient. This approach is backed by turf science research and is the standard recommendation from most horticulture experts. The AI accounts for this by providing the right amount of water in each session to reach the root zone without overwatering.

What's the warranty?

The Soildrops Controller includes a 1-year limited warranty covering manufacturing defects. Contact support@soildrops.com for warranty support.

Is Soildrops compatible with my current irrigation system?

Yes! SoilDrops is designed to replace any standard irrigation controller, making it compatible with all existing systems.

Can I manually control the system?

Yes! You can create manual schedules just like a traditional irrigation controller, but with a simpler, app-based interface. Plus, we offer a web URL, so you can access your irrigation controller from any device, anytime.


How does AI scheduling work?

Soildrops AI continuously analyzes moisture levels from your sensors and factors in weather forecasts to create the perfect watering schedule. It automatically adjusts based on real-time conditions, ensuring your lawn gets just the right amount of water—no more, no less.

How much water can I save?

The EPA estimates that 30% of residential irrigation is wasted due to overwatering. In our testing, SoilDrops users saved 30–50% on their water bills compared to traditional timers.

Why does SoilDrops allow each zone to water only once per day?

For most established lawns and landscapes, the best practice is one properly sized watering per day, not multiple starts. This reduces overwatering mistakes, supports healthier rooting, lowers runoff risk, and avoids conditions that can increase turf disease.


1) Most experts recommend deep, infrequent irrigation for home lawns

A long standing consensus in turf management is that home lawns should be irrigated deeply and less often, not repeatedly in the same day. Michigan State University summarized the common guidance like this, “The vast majority of university turfgrass specialists recommend deep infrequent irrigation.”  

UC IPM provides the homeowner version in one line, “Deep and infrequent watering will help promote a vigorous root system.”  

What this means in real life, if your lawn needs water today, give it the right amount once, then let the soil re aerate and the roots chase moisture deeper.


2) Multiple daily starts keep water near the surface, which encourages shallow rooting

Light, frequent irrigation tends to keep only the top layer wet. USGA explains the tradeoff clearly, “Light, daily or frequent irrigation keeps the top one to three inches of the soil moist.”  

USGA also states the downside in plain language, “Light frequent irrigation provides a healthy looking turfgrass, however, at the expense of the grass plant developing a deep root system.”  

So even if the lawn looks fine at first, the plant can become more dependent on frequent watering over time.


3) Many “twice a day” requests are actually runoff problems, not water demand problems

When people ask for multiple starts, the real issue is often that the sprinkler applies water faster than the soil can absorb it. The EPA describes the exact scenario, “Clay soils or steep slopes may not absorb water fast enough before it runs off.”  

If you allow multiple starts freely, homeowners often respond by stacking more water, which can increase runoff and waste rather than solving infiltration.
Bought on Amazon or in a store? Your warranty still applies

Soildrops products are covered by the full manufacturer warranty no matter where you bought them — Soildrops.com, Amazon, or a retail store. You deal with us directly either way; there is no need to go through the marketplace.

How to make a claim

  1. Email support@soildrops.com describing the problem.
  2. Include your proof of purchase: a Soildrops order number, or for Amazon and retail purchases, the order confirmation or receipt.
  3. If the issue is visible, attach a photo or short video — it usually lets us skip straight to the fix.

What happens next

If the unit is defective, we ship a replacement promptly and include a prepaid return label in the box so you can send the faulty unit back at no cost. Defective and damaged items are never charged a return fee.

One thing marketplace buyers should know: some marketplace sellers list our products at their own prices. The warranty covers the product itself regardless of seller, but for refunds (rather than warranty replacements) on a marketplace order, the marketplace's own return process applies first.

Maintenance

Winterizing Your Soildrops System

When overnight temperatures start approaching freezing, it is time to put the system to bed. Done in the right order, this takes under an hour — and spring startup takes five minutes.

When

Winterize before your area's first hard freeze. If you are in a region that blows out irrigation lines, book your irrigation pro early — they fill up weeks in advance.

1. Shut off the irrigation water supply

Close the shut-off valve that feeds your sprinkler system, and drain or insulate the backflow preventer per your local pro's advice. Water left in lines, valves, or the backflow preventer is what cracks them in a freeze.

2. Drain or blow out the lines — controller still plugged in

If your winters freeze hard, have the lines professionally blown out with compressed air. Keep the controller plugged in for this step — your pro can open each zone from the app with Quick Run while blowing air through, which is exactly what they need.

3. Bring the sensors inside

Pull your soil moisture sensors before the ground freezes — frozen soil grips the probe, and forcing it out can damage the sensor. Pull gently and straight up, wipe them clean, and store them indoors.

  • No need to unpair. Pairing survives the winter — in spring you just push them back into the soil.
  • No need to remove the battery. The CR2477 is fine in indoor storage.

4. Unplug the controller

Some smart controllers offer a "standby" or "hibernation" mode that keeps the unit powered all winter. Soildrops does not need one — just unplug it. It draws zero power all winter, and every zone, schedule, and sensor pairing is saved to your account, not the box. When you plug it back in come spring, it reconnects to your Wi-Fi on its own.

Unplug — do not factory reset. Unplugging is all winter storage requires. Holding the reset button for 12 seconds is a factory reset, which wipes your zones, schedules, and sensor pairings.
Expect "Offline" in the app all winter. That is normal — the controller is unplugged. To stop offline alert emails while it hibernates, see Managing Offline Alerts and Notifications.

Spring startup

  1. Open the irrigation water supply and check the backflow preventer.
  2. Plug the controller back in. All four LEDs light up and it rejoins your Wi-Fi automatically. (Changed your Wi-Fi password over the winter? Update it in Settings → Wi-Fi.)
  3. Push the sensors back into moist soil — water the spot first, or run the zone briefly. If a sensor reads 0% at first, see Sensor reads 0% or much lower than expected.
  4. Run a short Quick Run on each zone to confirm heads and valves survived the winter.
  5. Check your schedules and let the AI take it from there.
No articles found. Try a different search term.